I am also going to share with you a few of the settings you should consider understanding and using inside the DJI Go app to help make capturing imagery easier and better.
Check out my video tutorial below or read all about how to do it after the jump!

I know talking settings can be pretty dry, but I think it’s really important to understand them, so you can focus on getting the best images possible, with the least amount of confusion and frustration when you are out flying.
In this drone tutorial you’ll learn the answers to the following questions:
- Why and how to shoot in MANUAL mode instead of AUTO
- What is ISO and how and why do I set it?
- How does the Exposure Value/M.M. Meter work?
- Why use the Histogram?
- What is the Over-Exposure Warning (zebra lines)?
- Why use Auto Focus Continuous focus?
- Why use the Grid Lines & Center Point?
- What are the various DJI Go app shooting modes?
- Why shoot in RAW and never JPEG?
- How to set custom buttons and why?
So let’s get started!
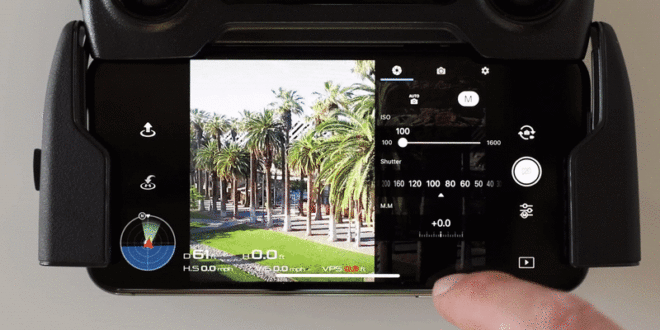
Manual Mode
The first thing I suggest is to shoot in MANUAL MODE.
I prefer to shoot all my photos using manual mode because it gives me the most control for properly exposing my images.
To do this select the camera settings icon that is right below the big white shutter button on the right-hand side of the screen in the DJI Go app.
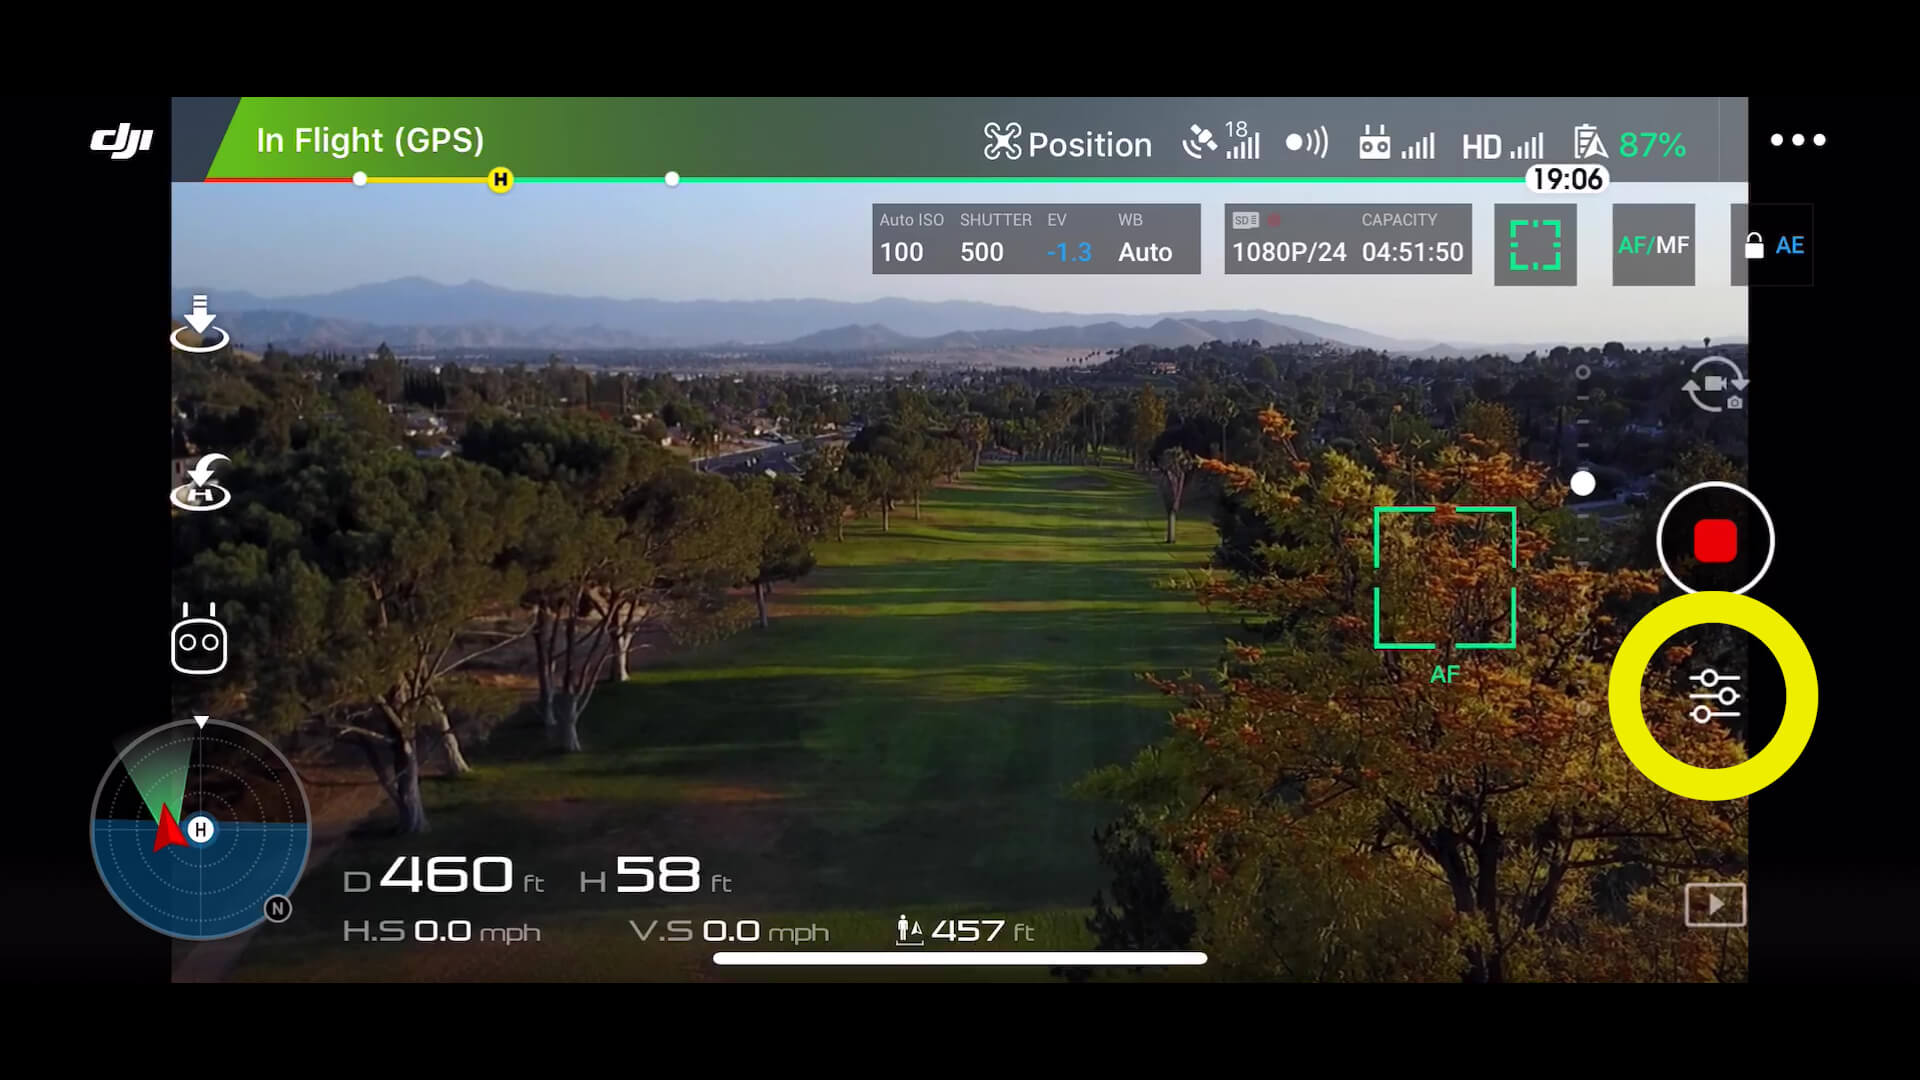

Then select the icon with the big M Button that is right next to the icon with the camera that says AUTO.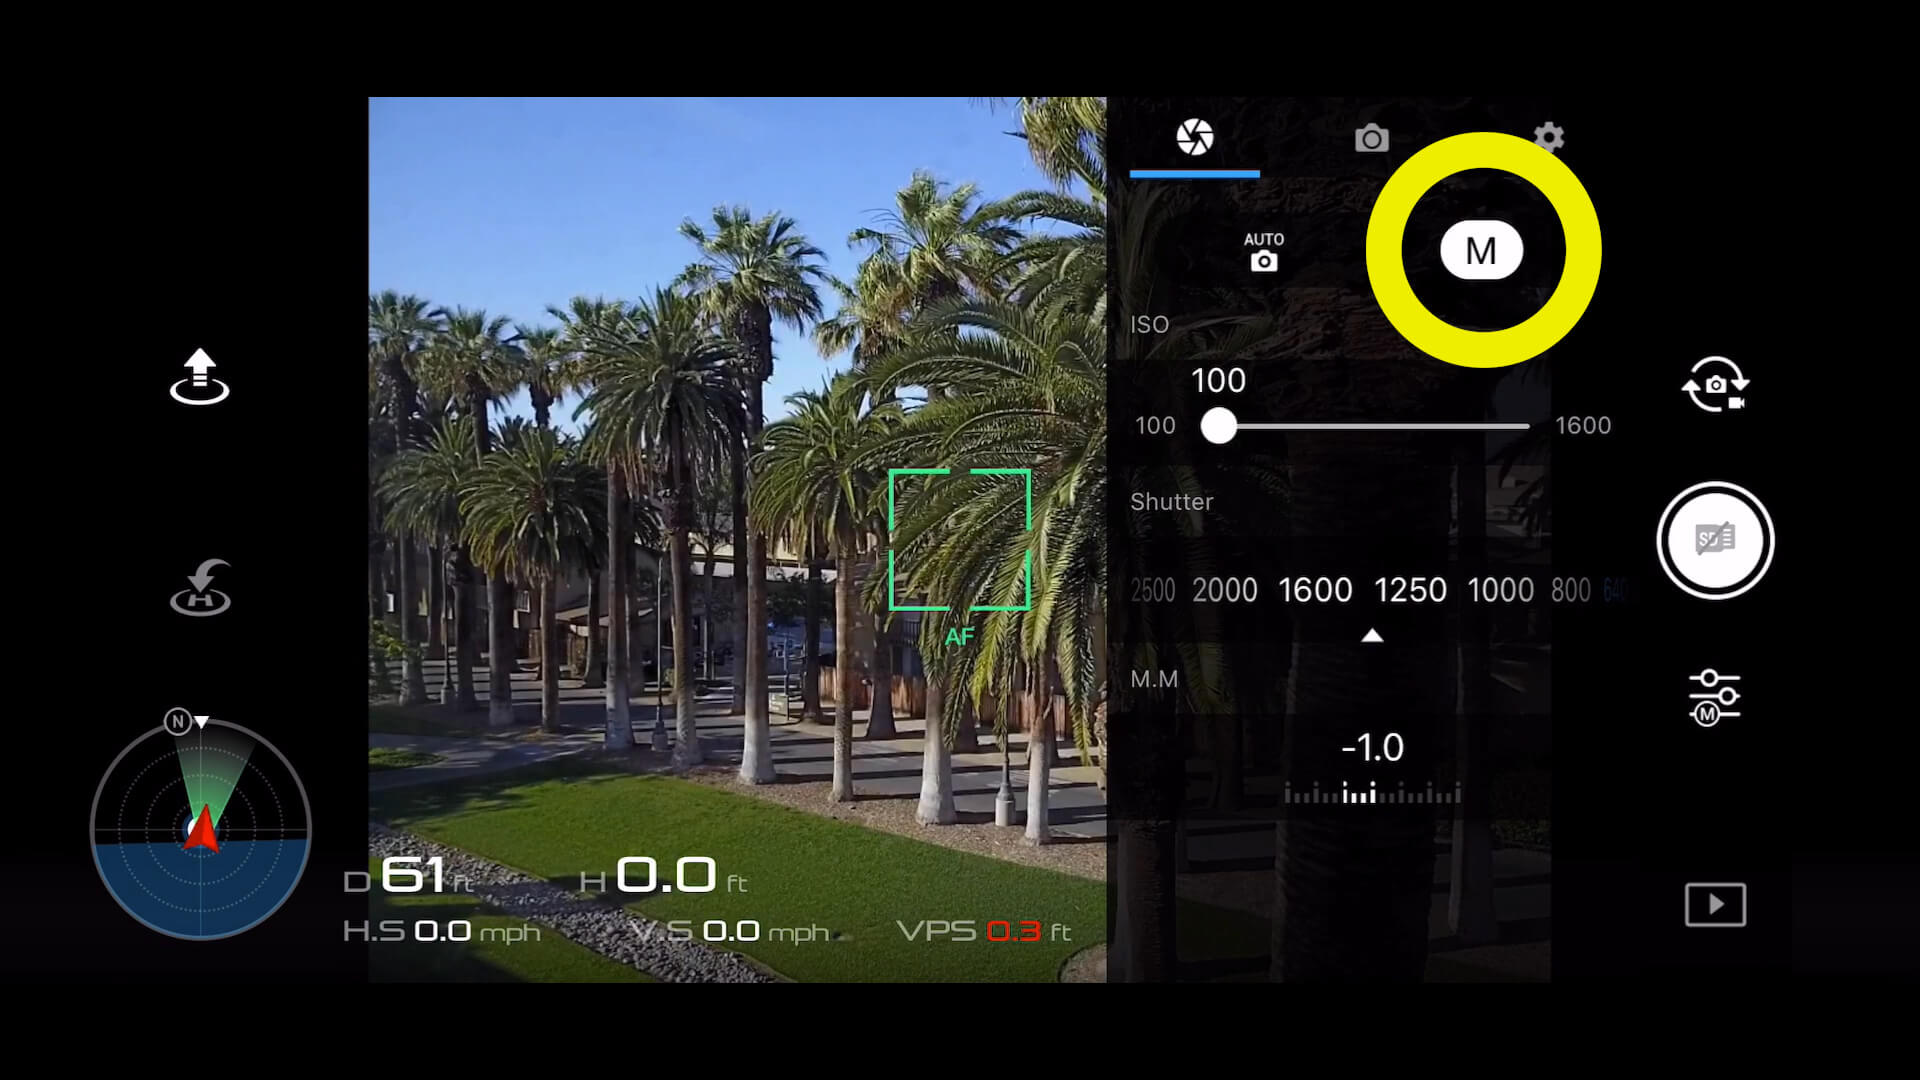
Shooting in manual mode is great because it locks the camera’s settings until you make a change.
ISO
Next, I like to set the ISO to the lowest option possible for the conditions I’m shooting in, so that my images don’t turn out too noisy/grainy.
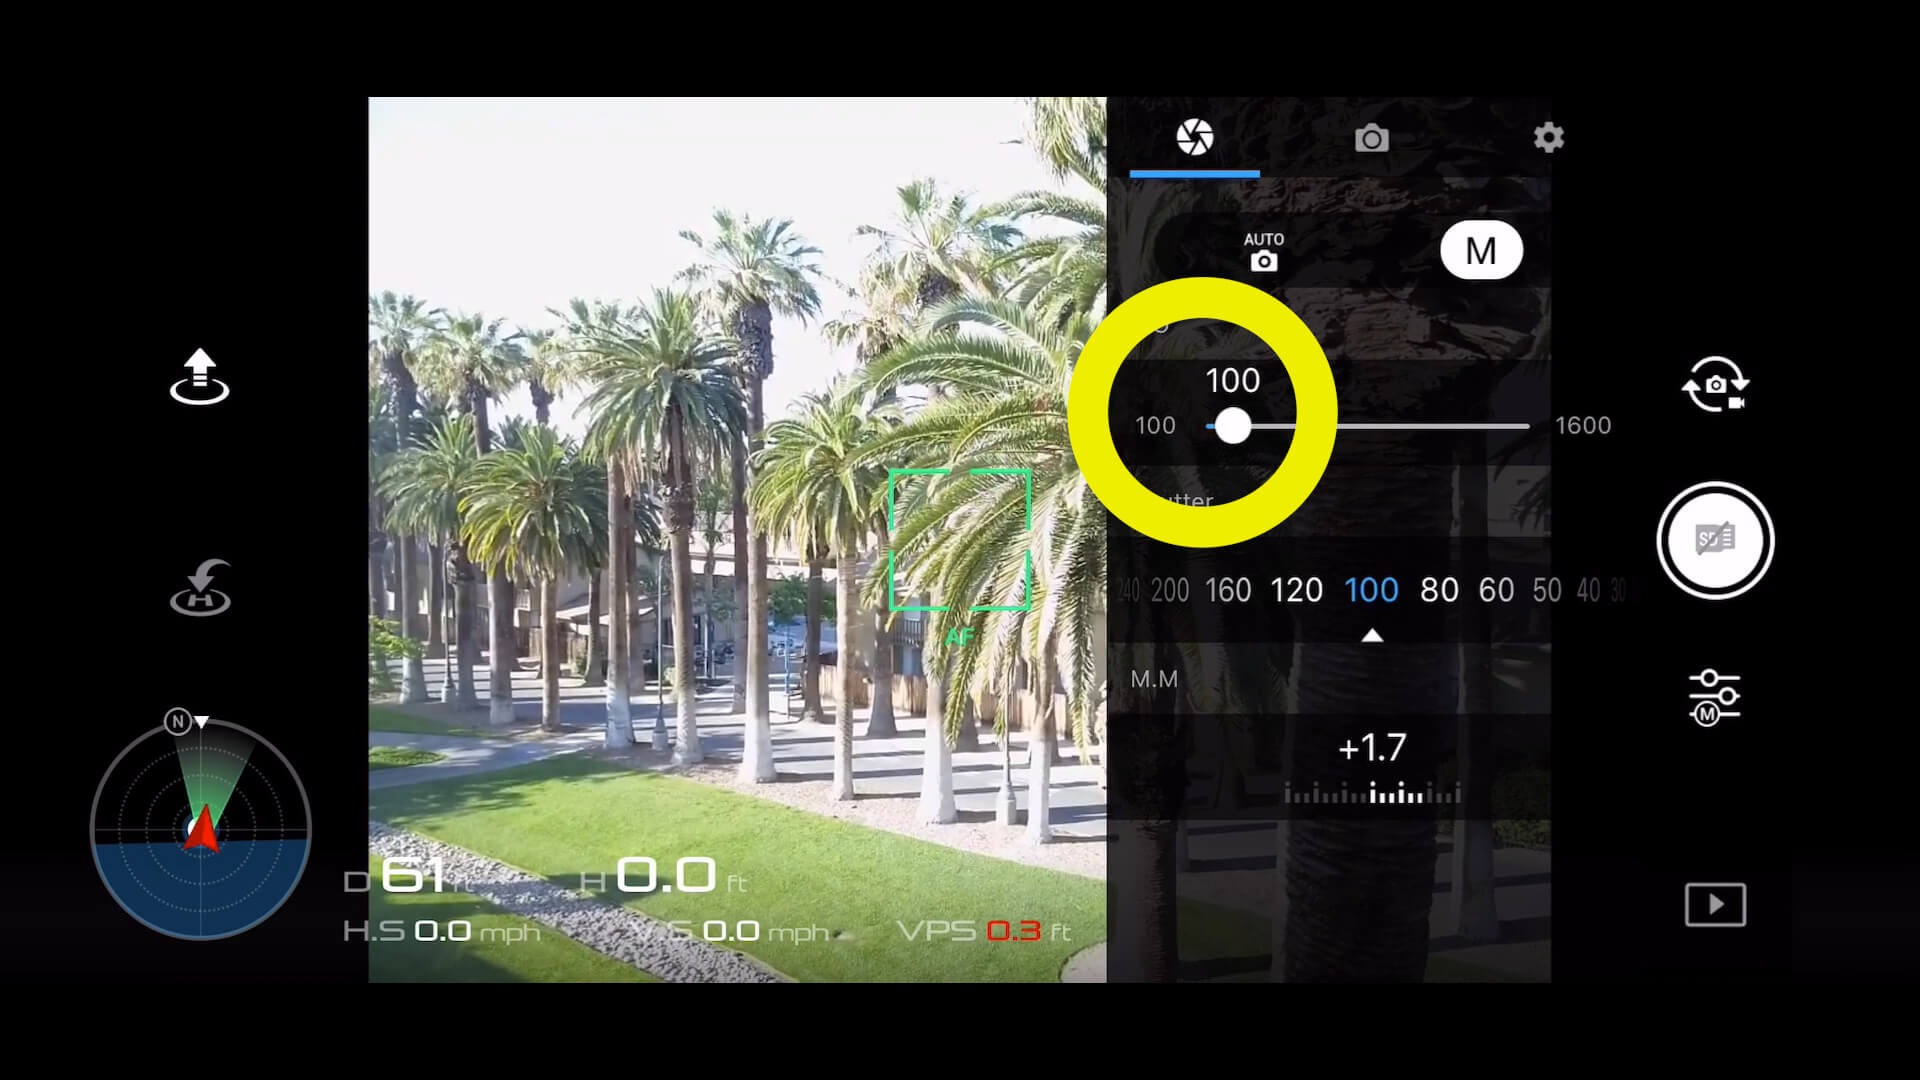
On bright sunny days, it is best to use a lower ISO such as ISO 100, and on cloudier days you might try ISO 400 or higher.
If you’re wondering, ISO stands for the International Organization of Standardization. This is the main governing body that standardizes sensitivity ratings for camera sensors.
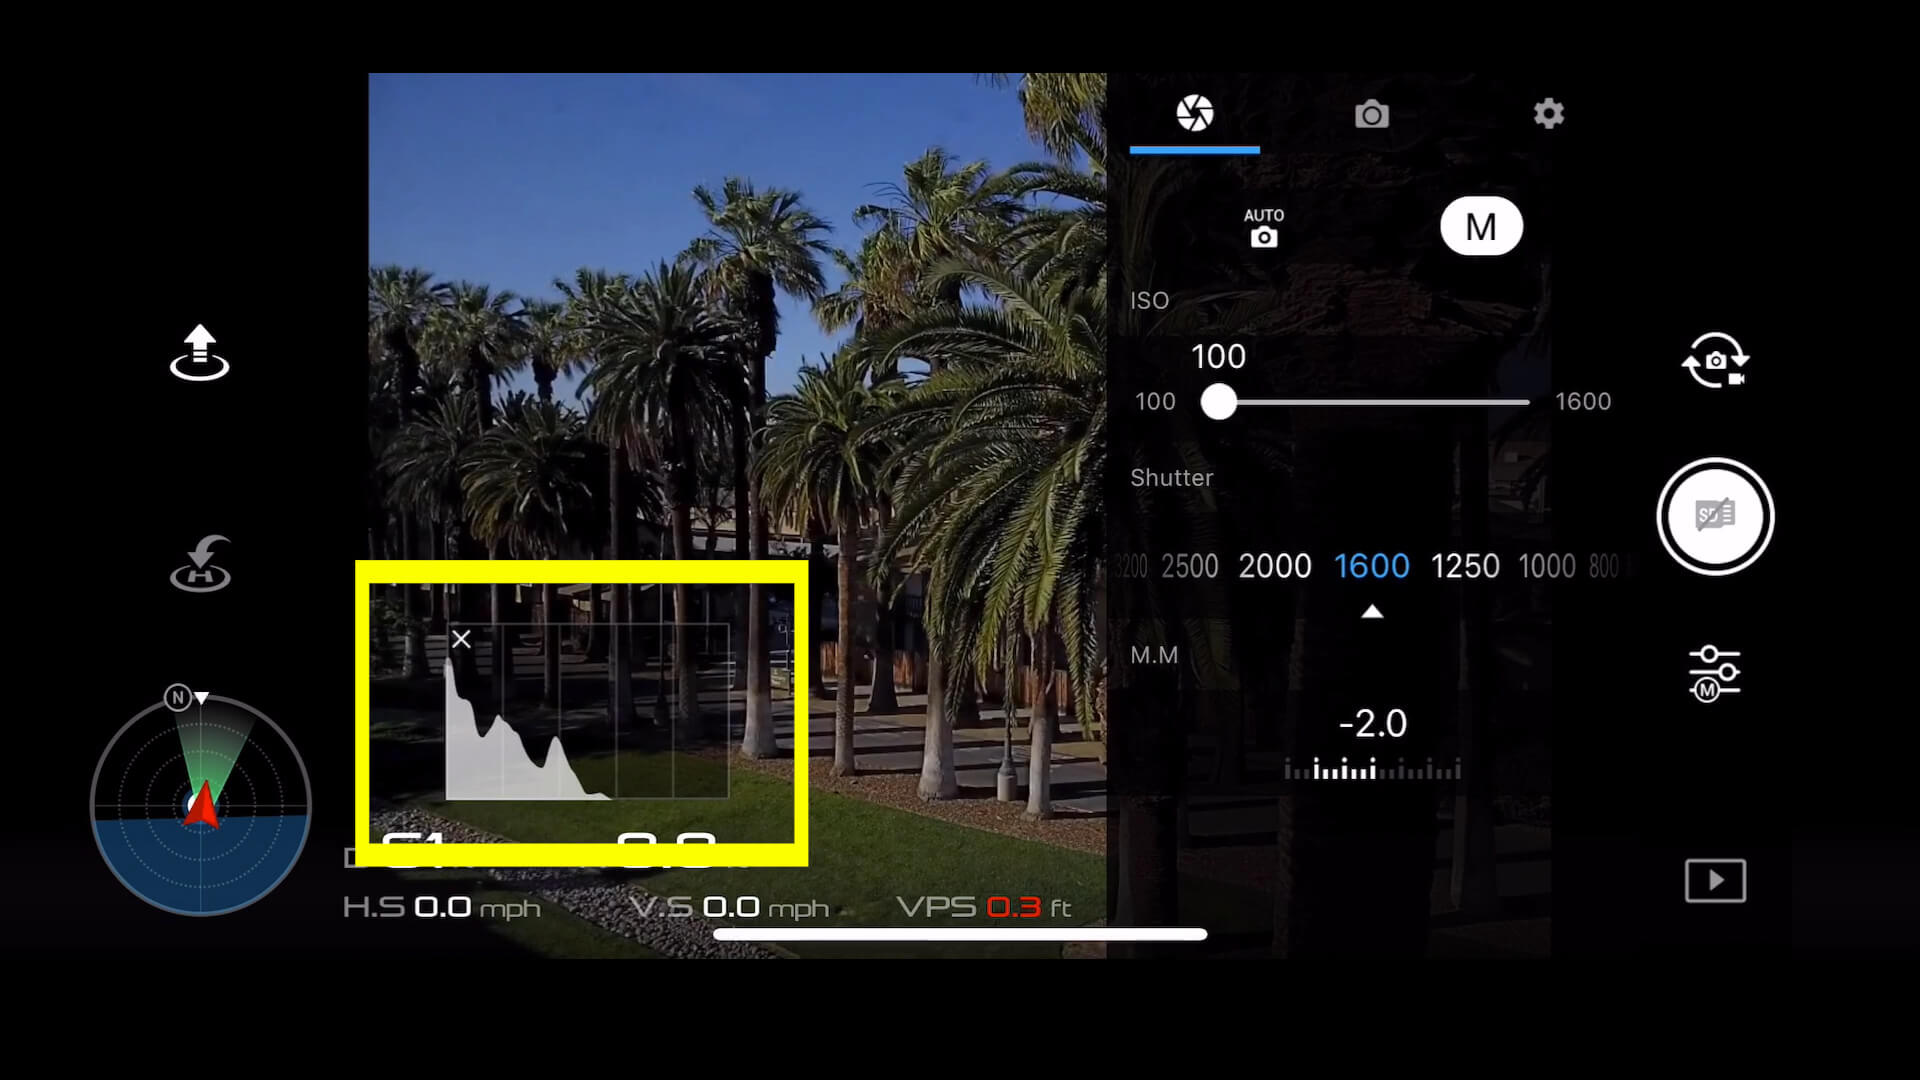
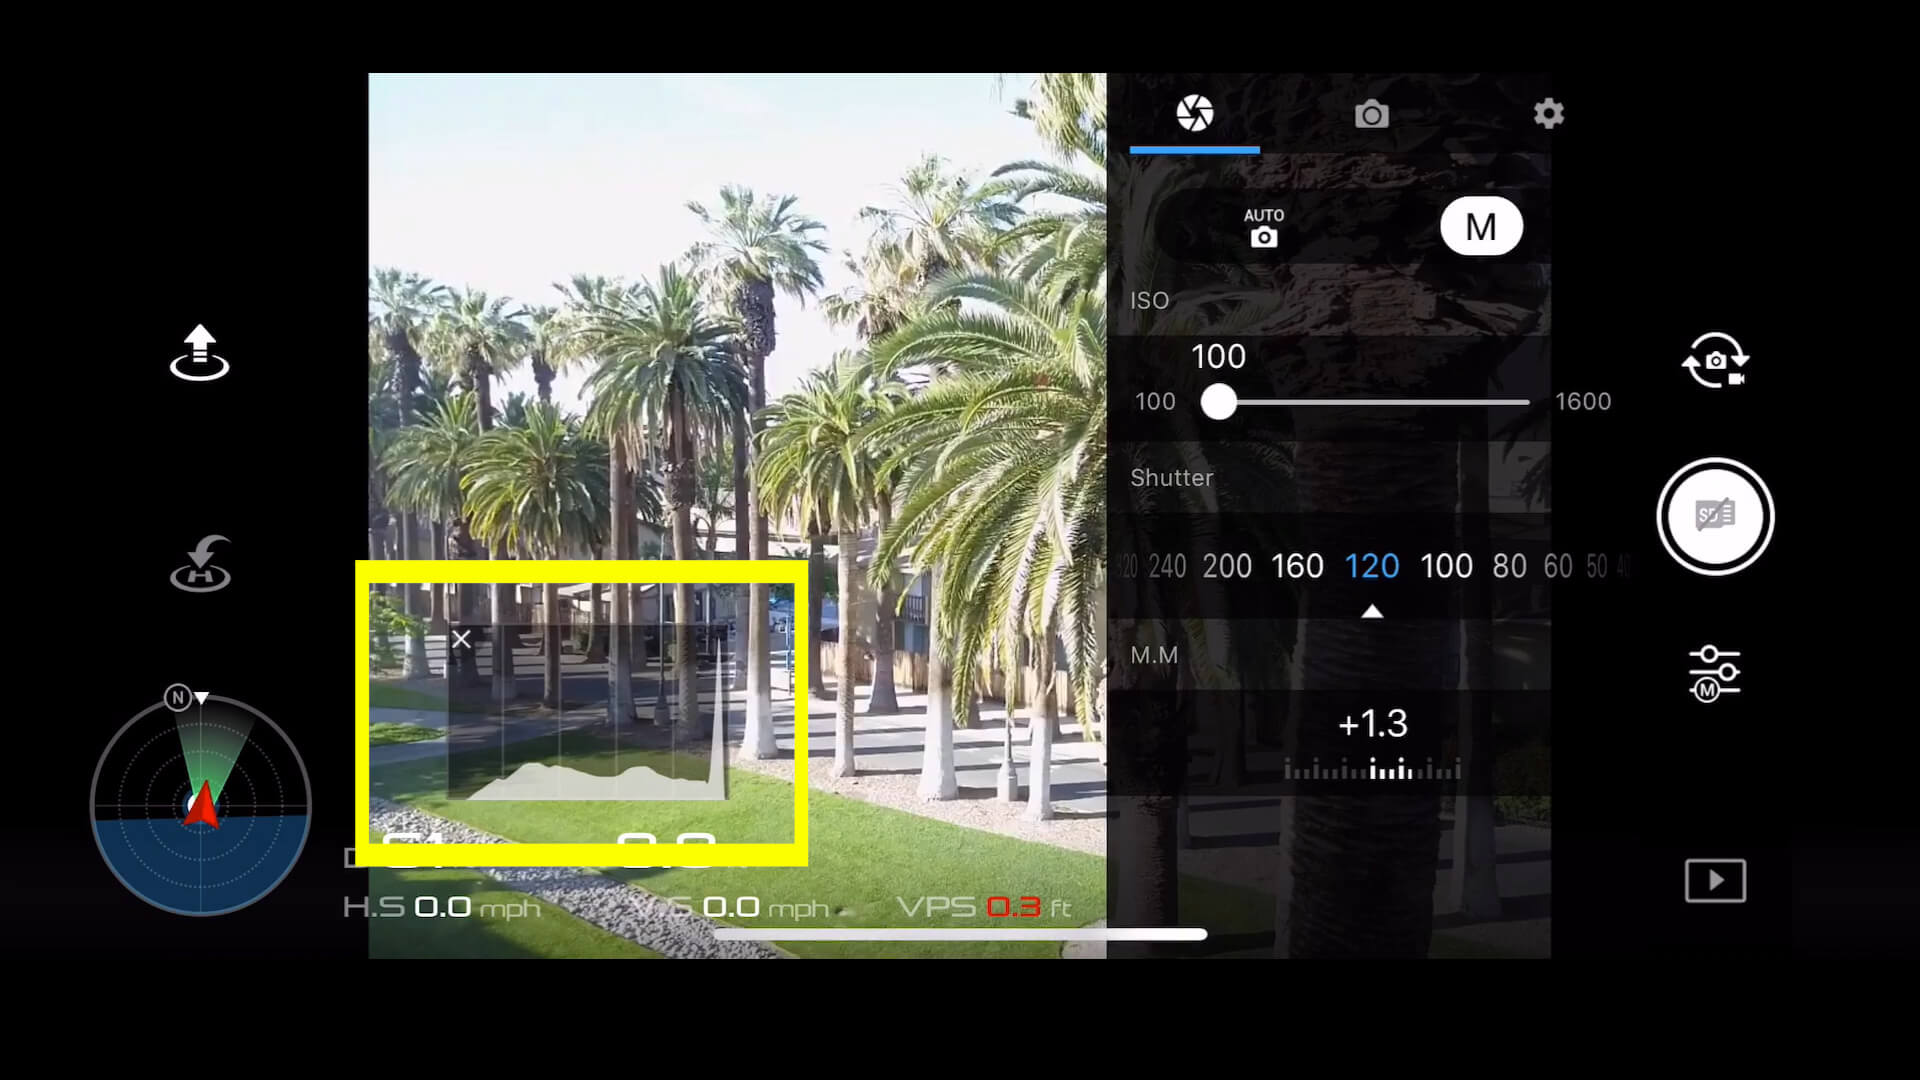
Exposure Value/M.M. Meter
Before adjusting the shutter, consider looking at the Exposure (EV)/M.M. meter.
This is a really helpful indicator that will assist you in determining what the exposure should be set to.

This meter lets you know what the camera thinks the exposure should be set to.
You can then adjust the shutter by scrolling to zero to agree with that suggestion, or you can use the exposure dial on the top right-hand side of your remote to let in more light or less light.
Histogram
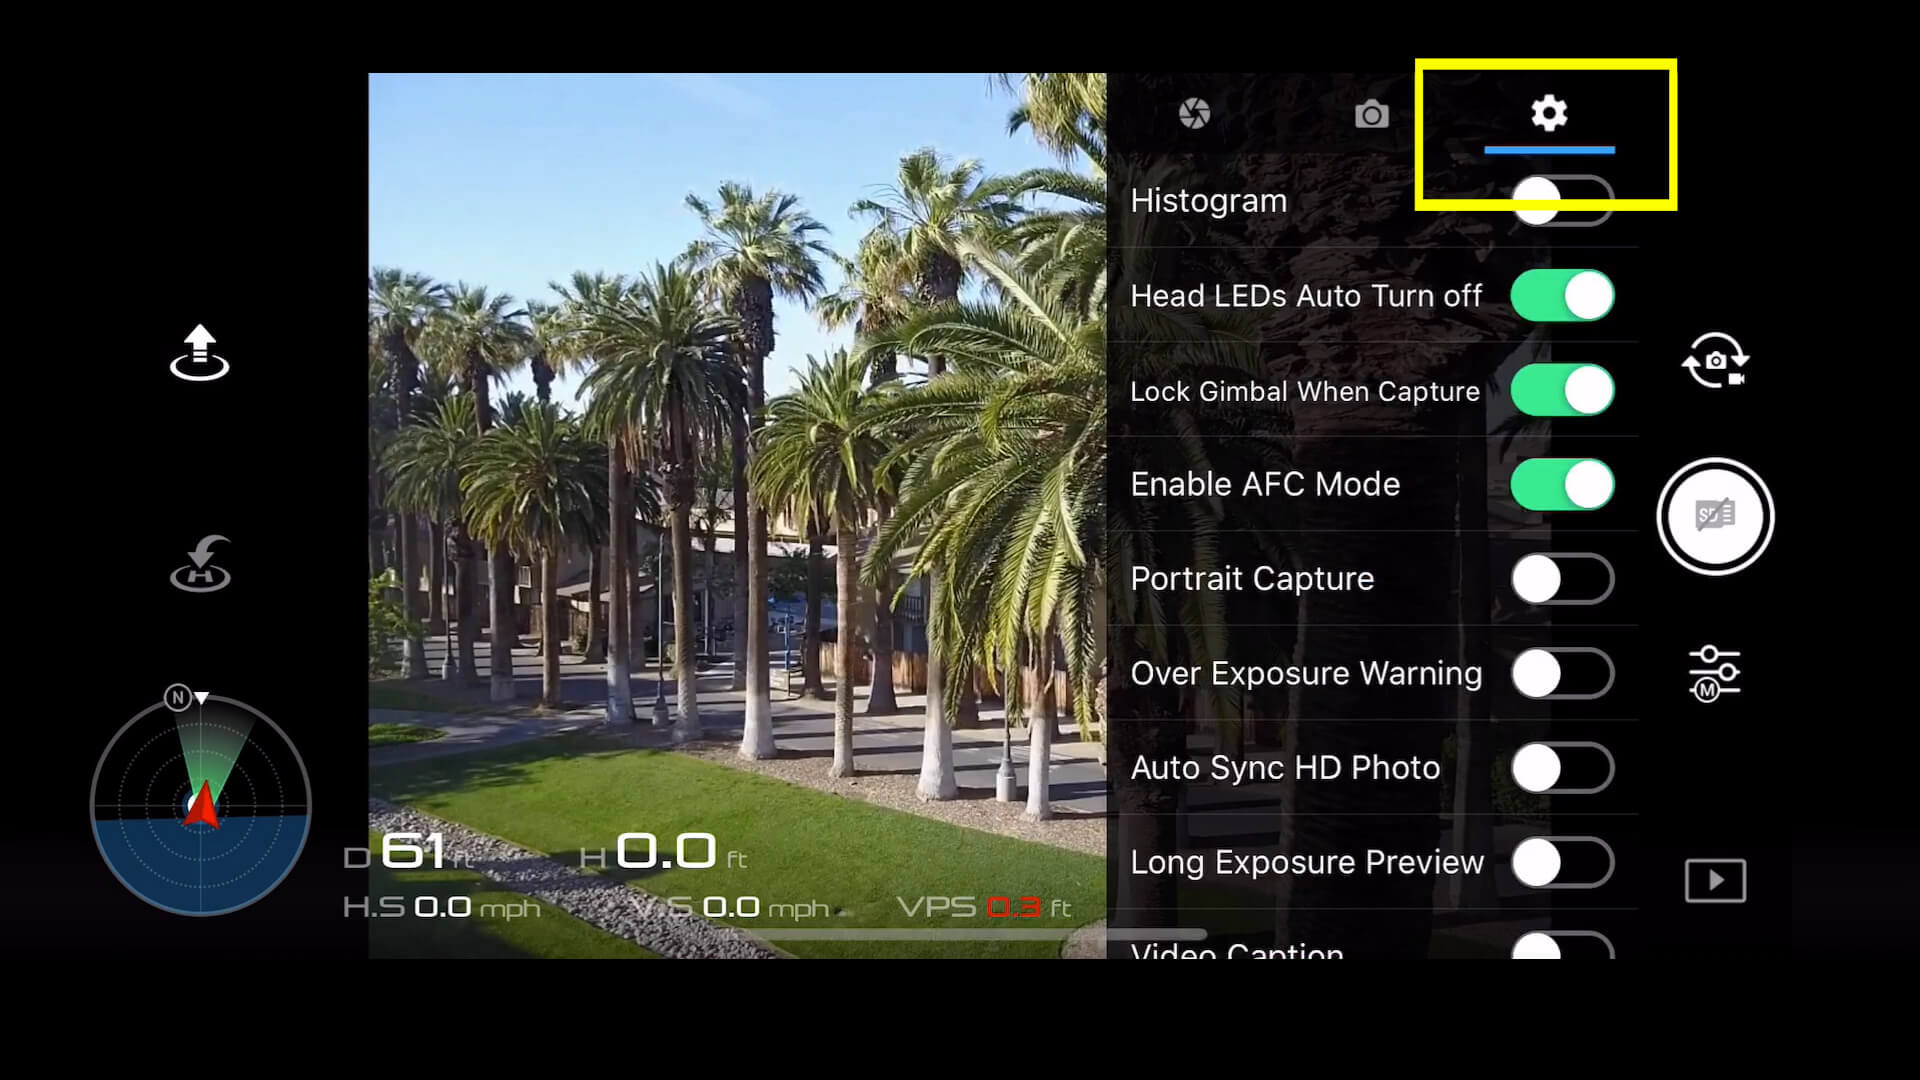
Another helpful indicator for setting the exposure is the histogram.
You can find this by going to the gear icon and turning on the histogram.
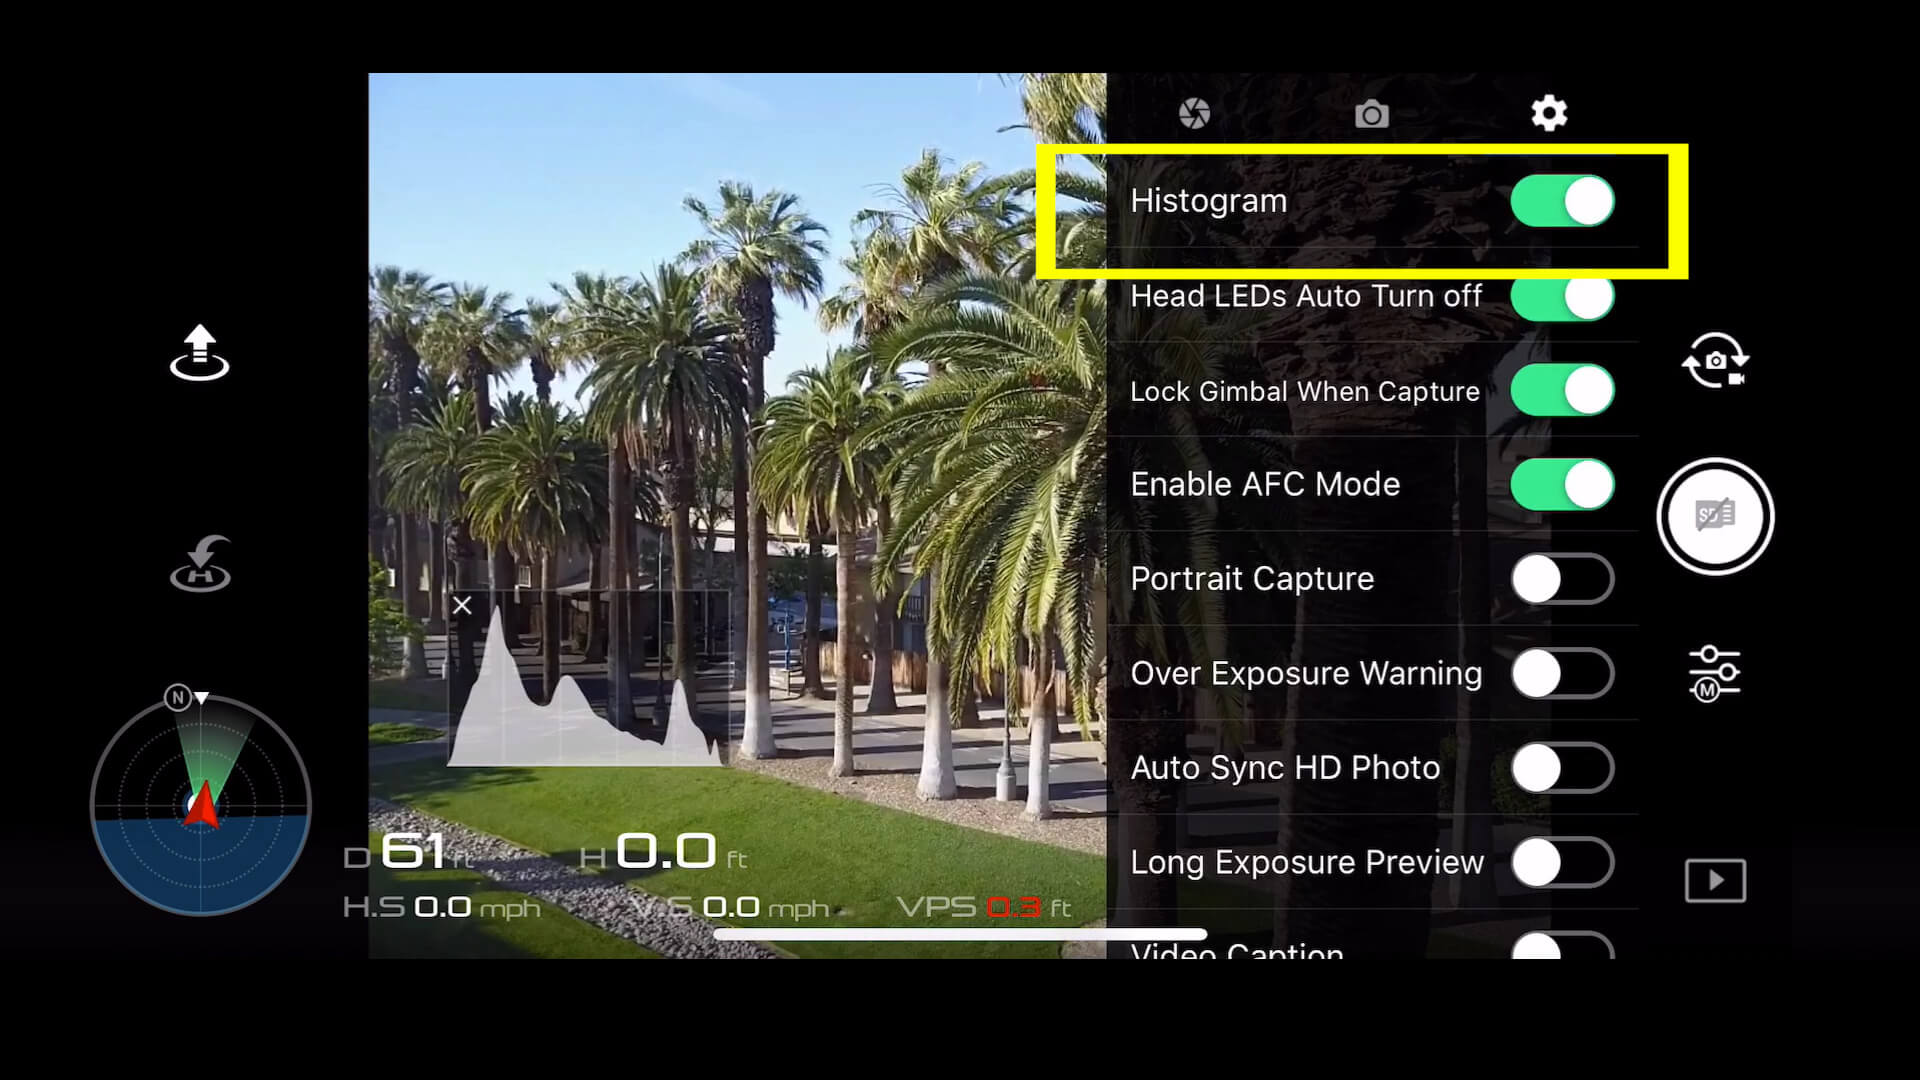
You can move this around anywhere on the screen just by clicking and dragging it. I usually place this off to the side so it is out of the way.
Generally speaking you want a nice balanced histogram. If the readout is all bunched up on the left side of the graph, then your image will be too dark.
If it’s all bunched up on the right side of your graph, your image will be too bright.
So try and find an exposure setting where the graph is nicely spread out and balanced.
Over-Exposure Warning (zebra lines)
Another helpful indicator for setting the exposure can be the overexposure warning.
This option will display zebra bars on your screen where the image is blown out.
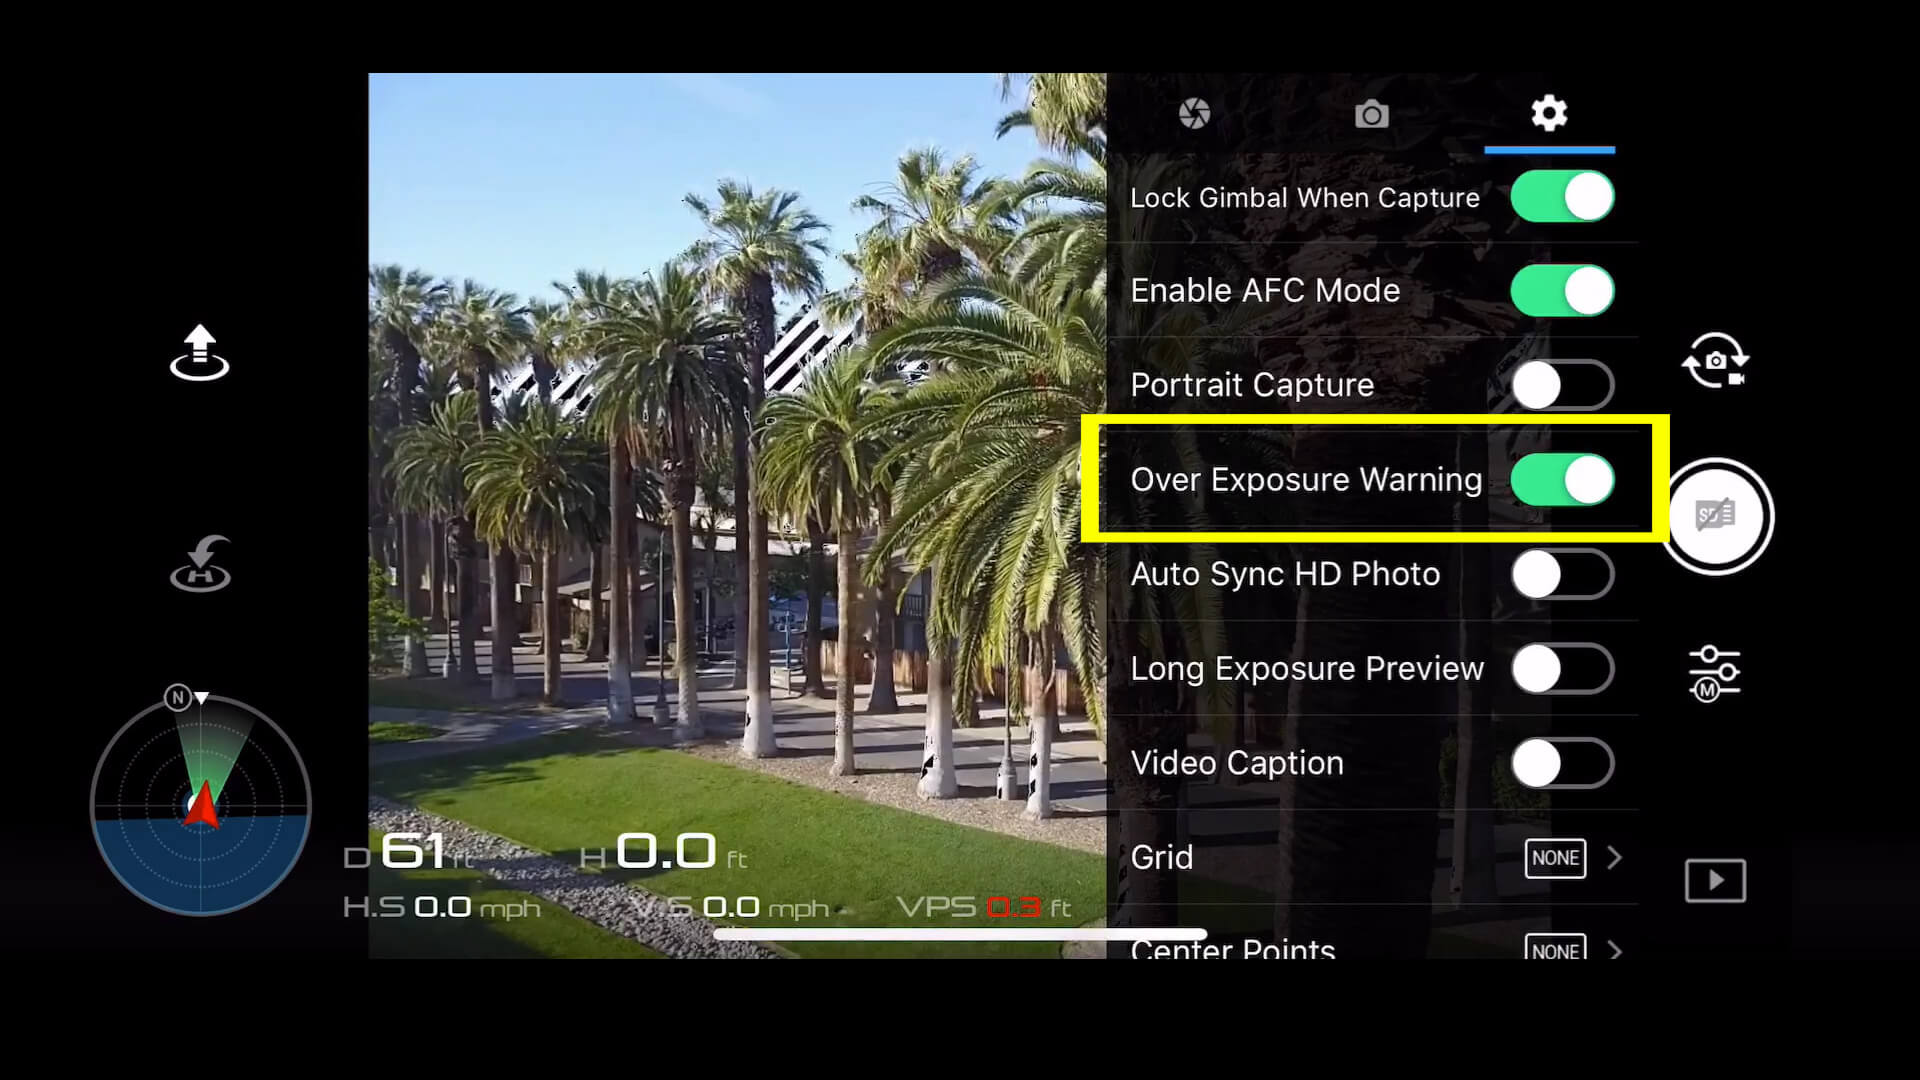
Now it’s not bad to have some zebra bars, but you definitely don’t want a lot of them if you’re trying to capture an evenly balanced image.
Seeing zebra bars can be really helpful when you have trouble seeing your screen like on bright sunny days.
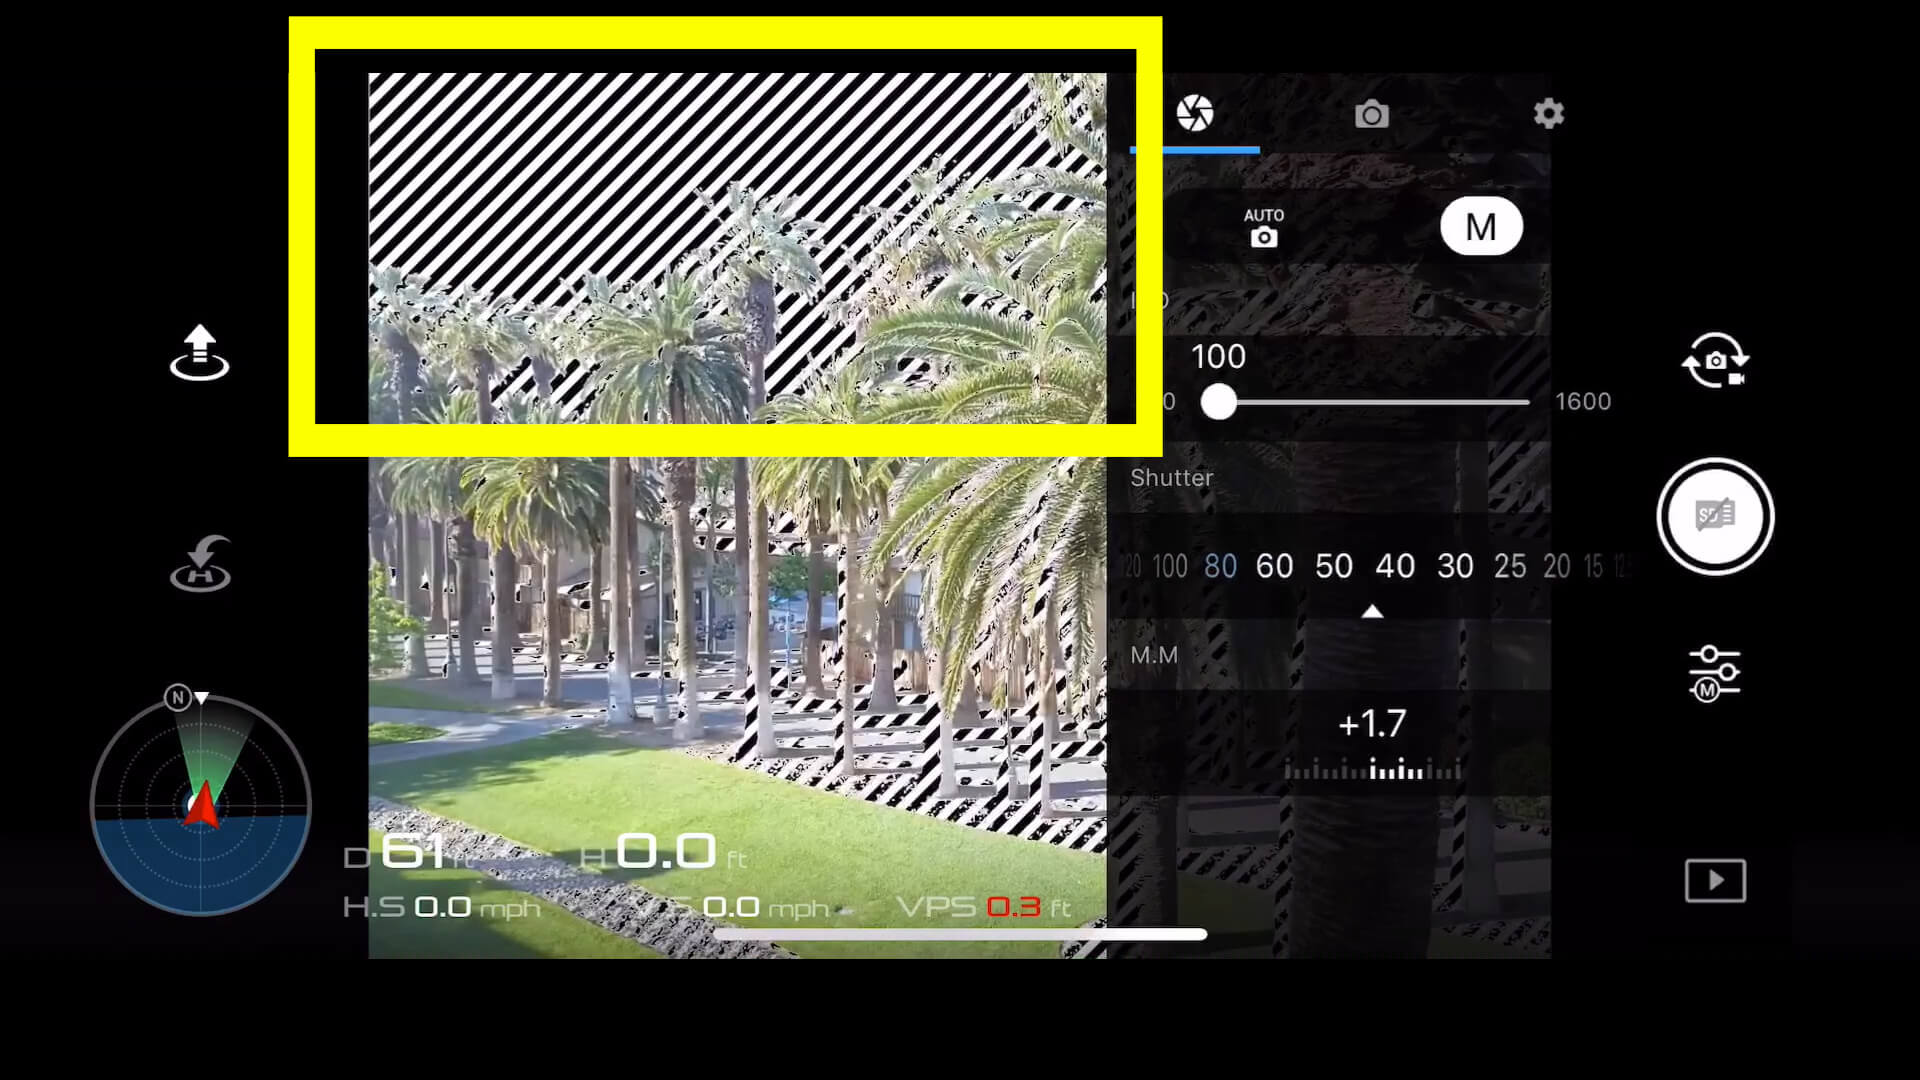
I like to underexpose my images just a bit, and then I do any brightening in post. When you blow out your highlights, they can be really hard to recover, so I like to play it safe.
Auto Focus Continuous
Next, make sure you turn on AFC, or Auto Focus Continuous.
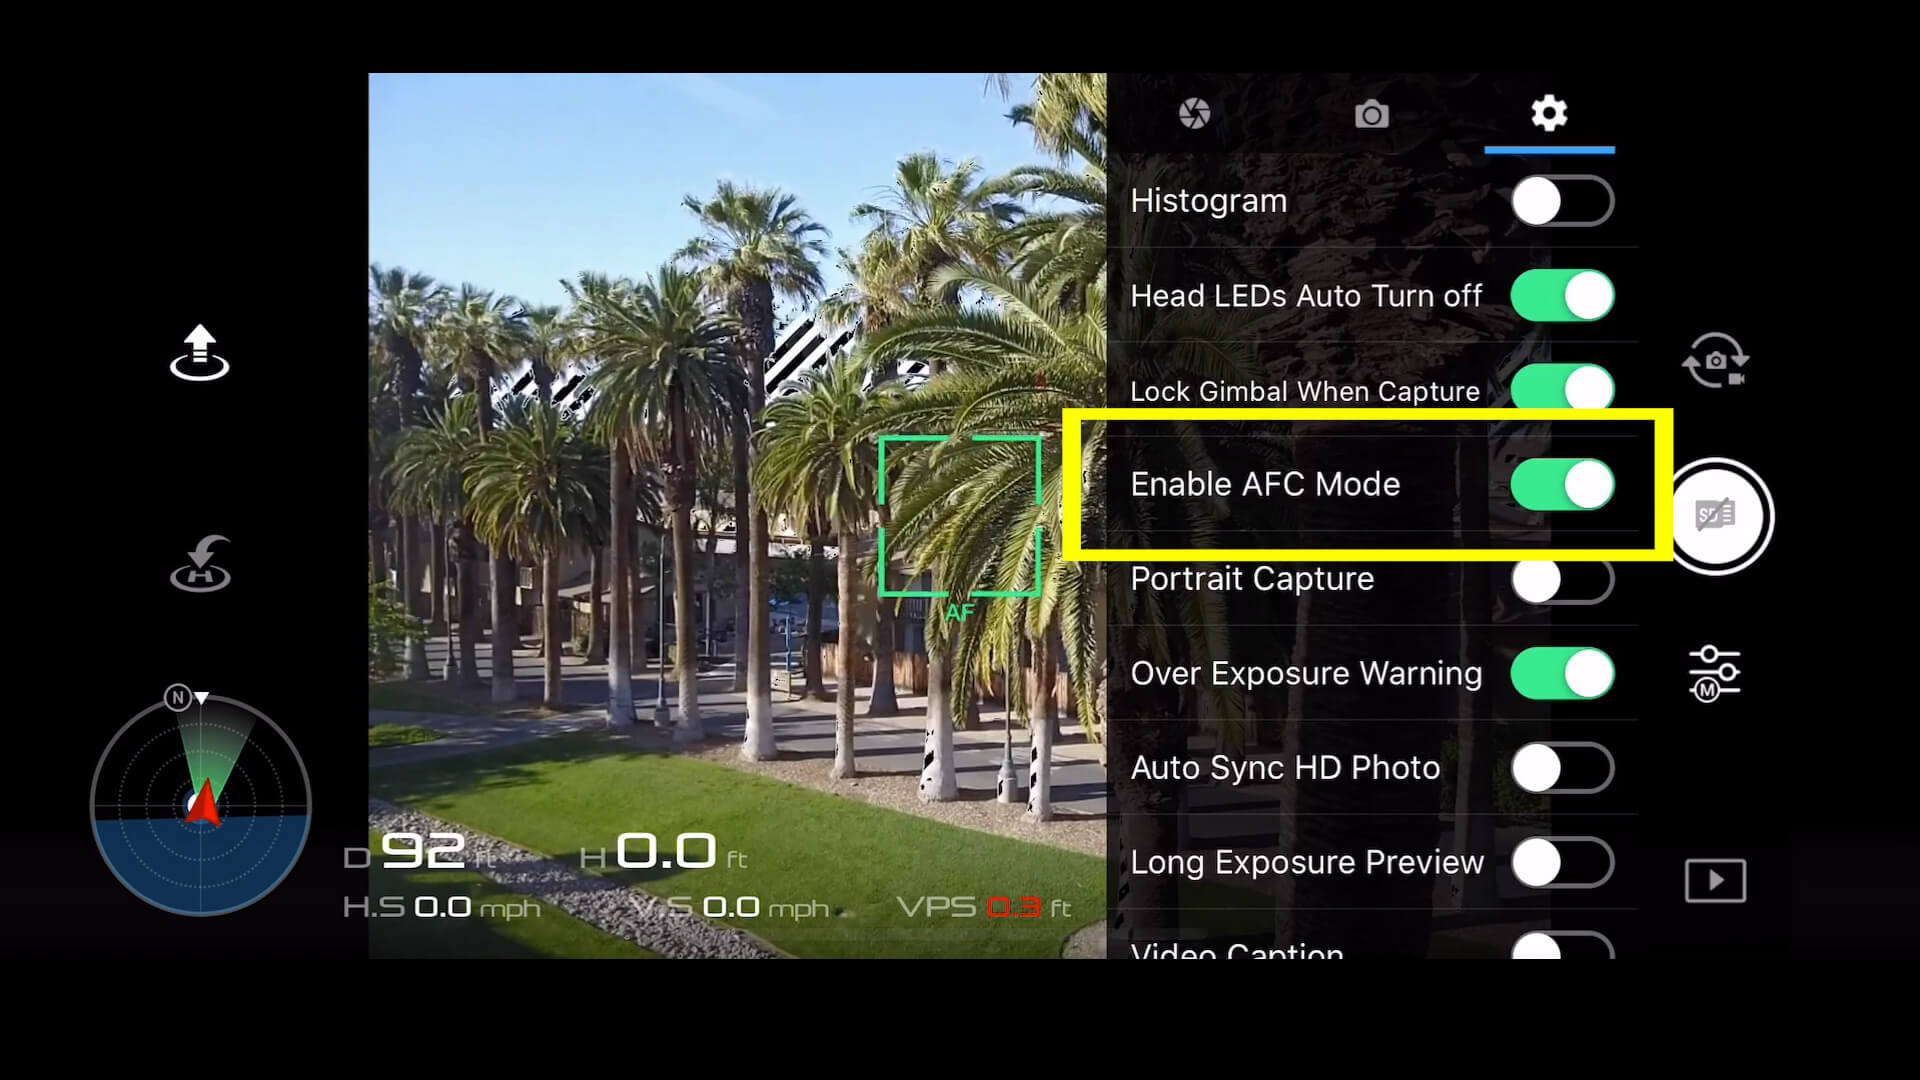
This means the camera will continually focus at the center of the screen, so you don’t have to keep remembering to tap to focus.
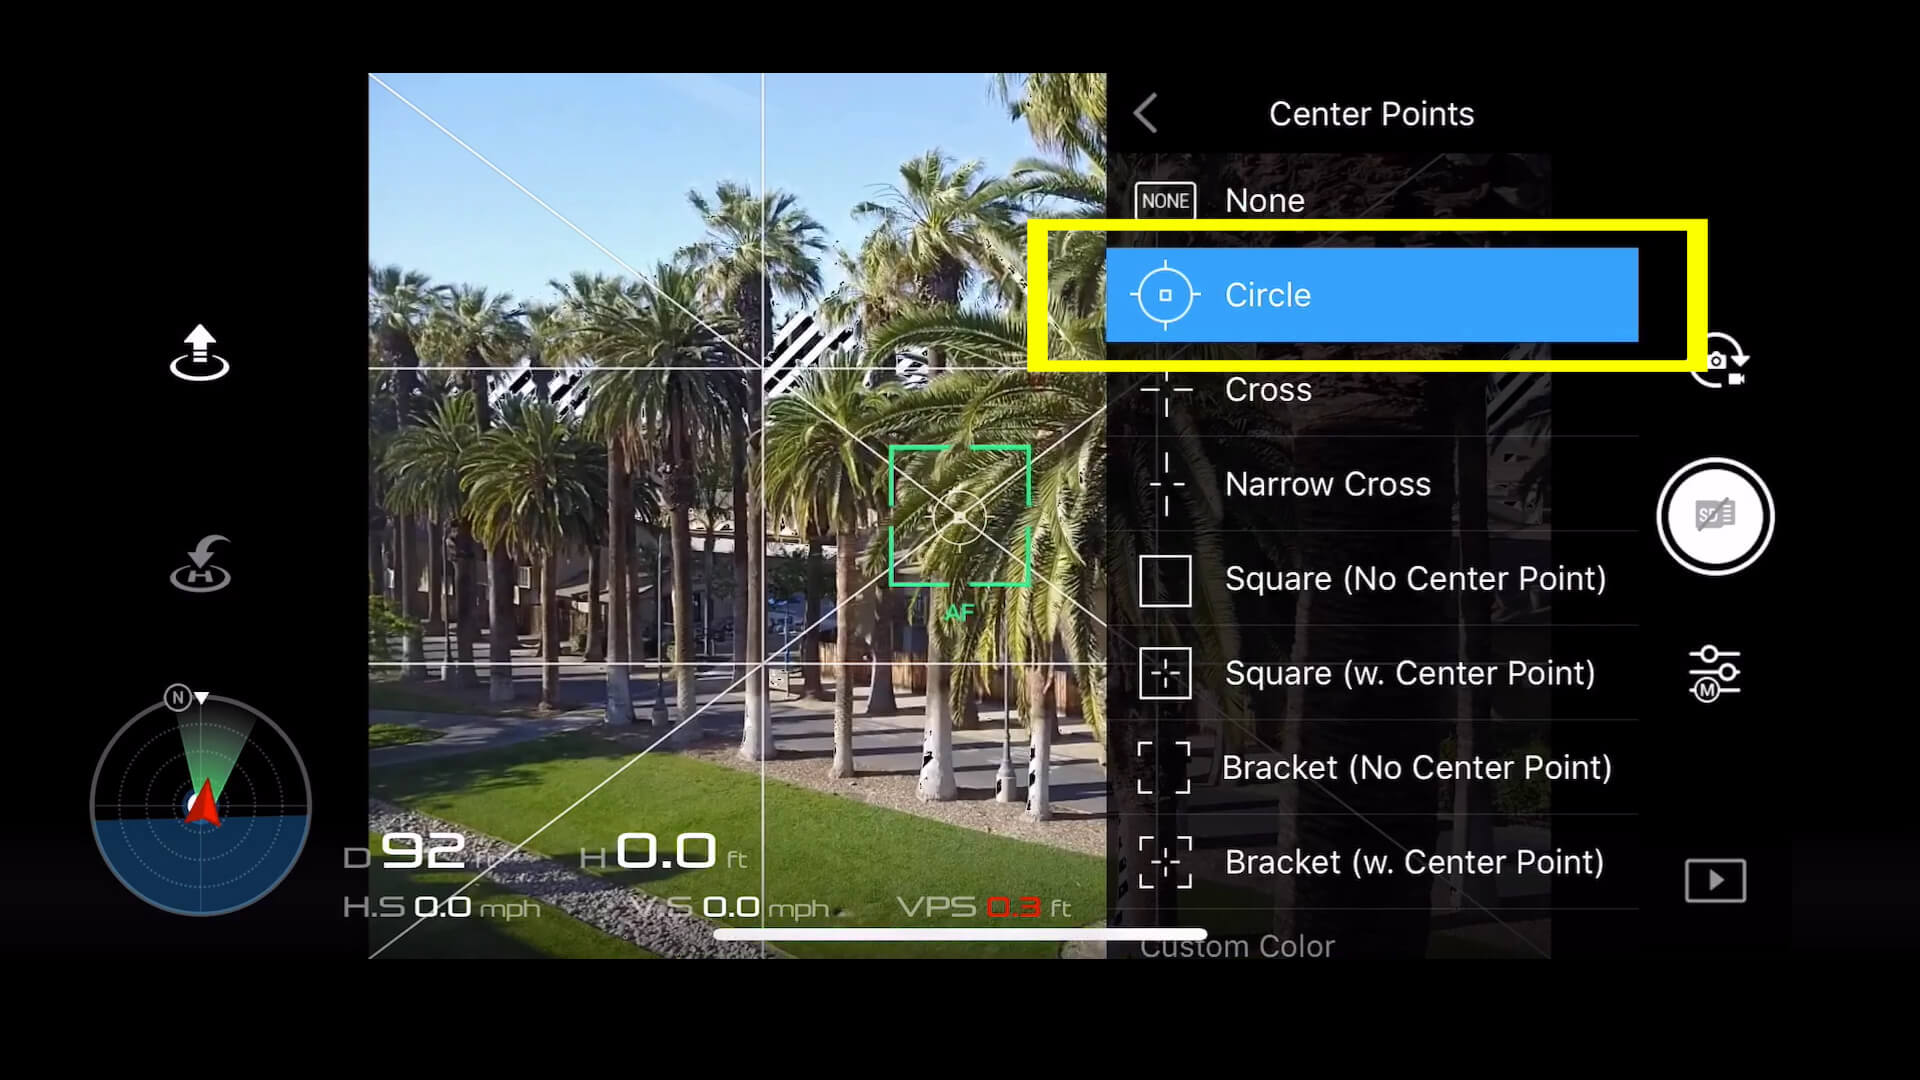
Grid Lines & Center Point
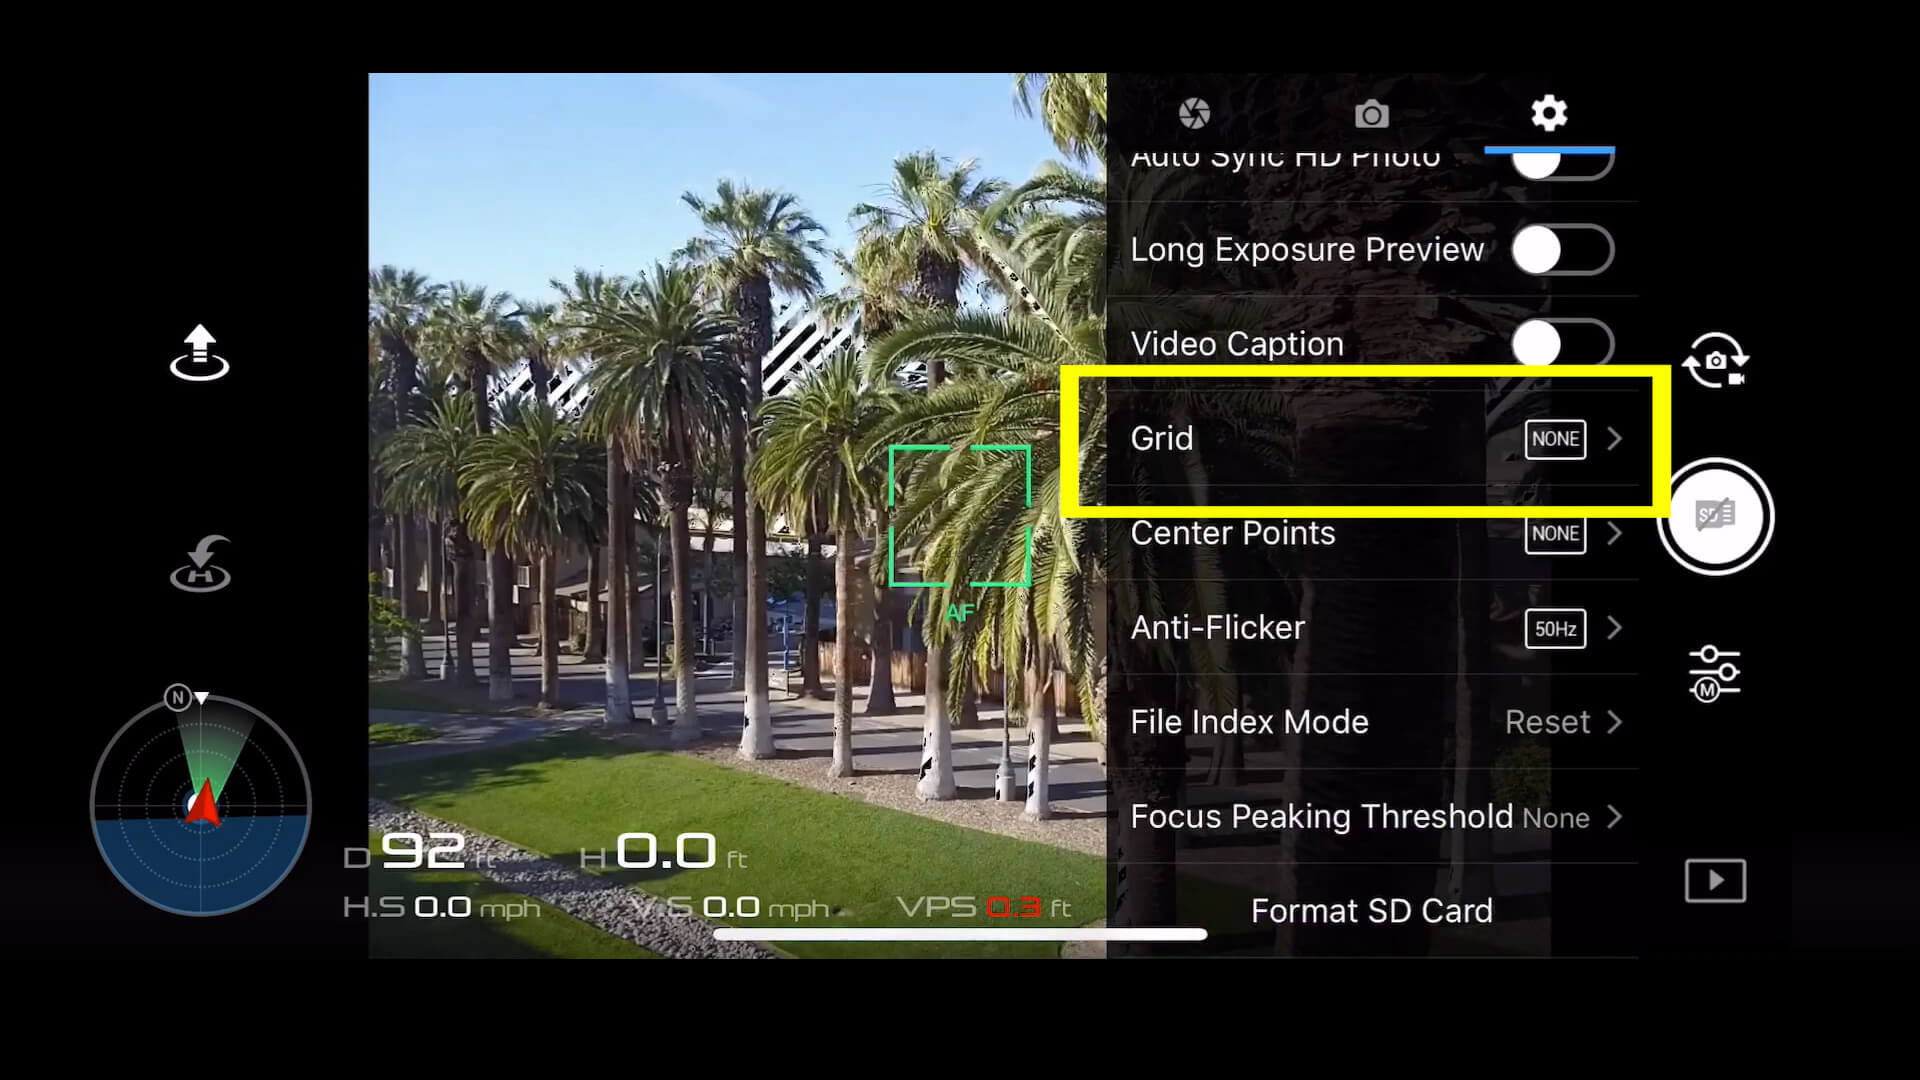
This leads us to the next helpful setting for determining where the center is.

I recommend you turn on the grid lines and the center point, so you can have visual indicators to help you will composing your images.
This will help you with your framing serving as a marker so you can perfectly line up your horizon or so you can properly line up your subject.
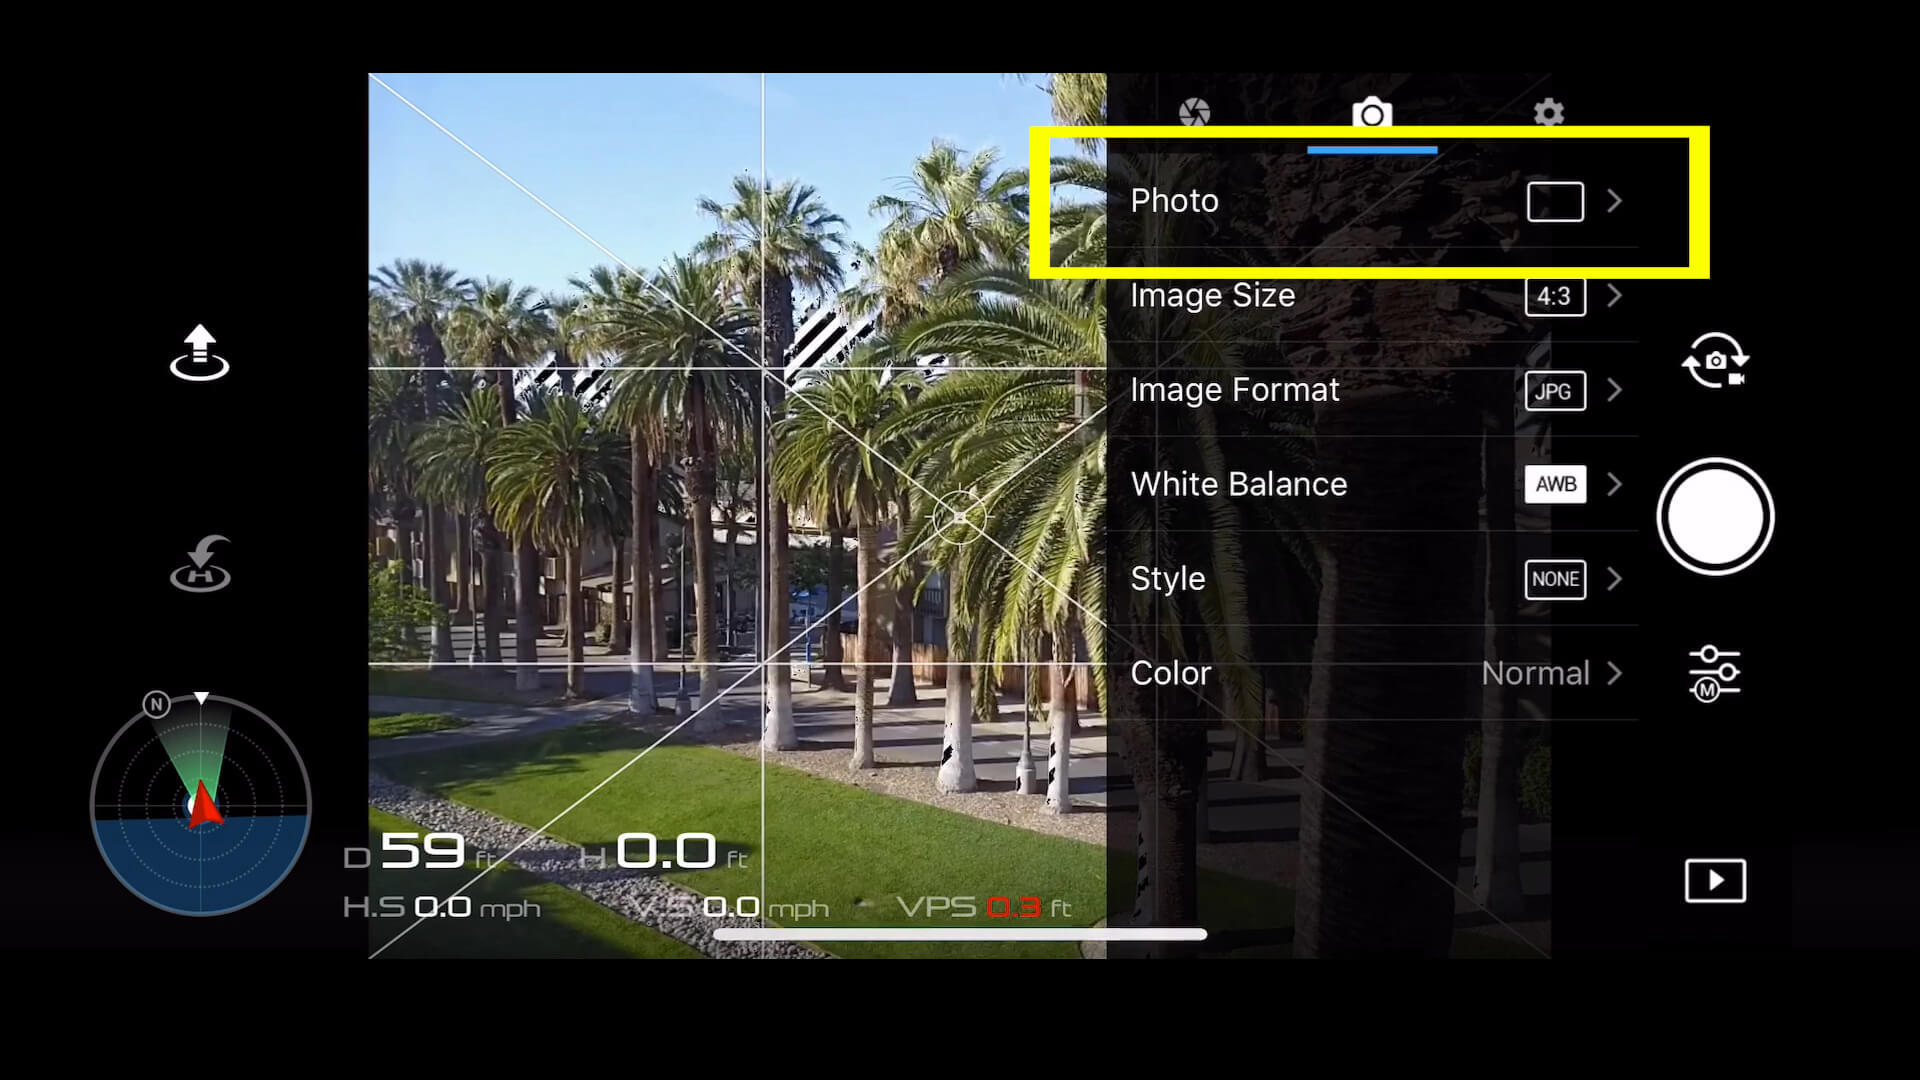
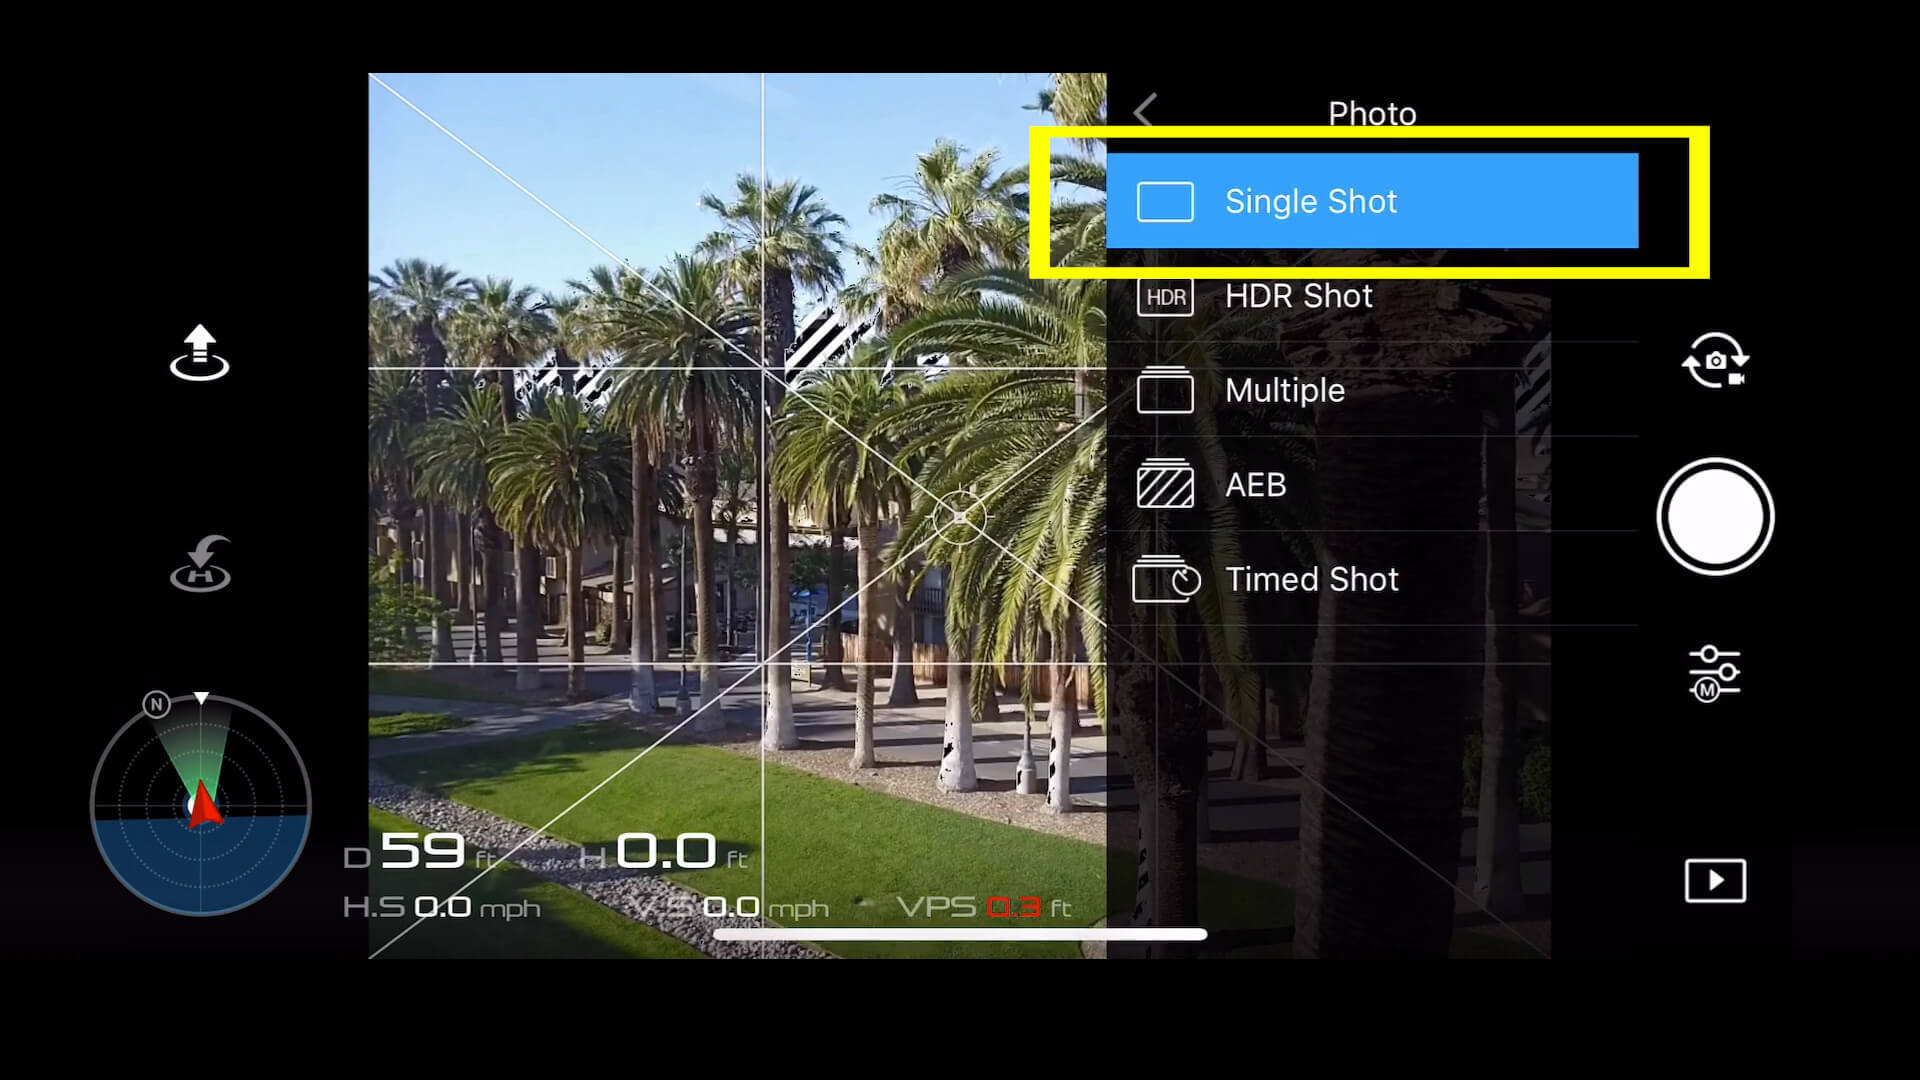
Shooting Modes
Let’s now go over to the camera icon in the camera settings menu.
SINGLE SHOT MODE
If I am just shooting around, I tend to stay in the single shot mode.
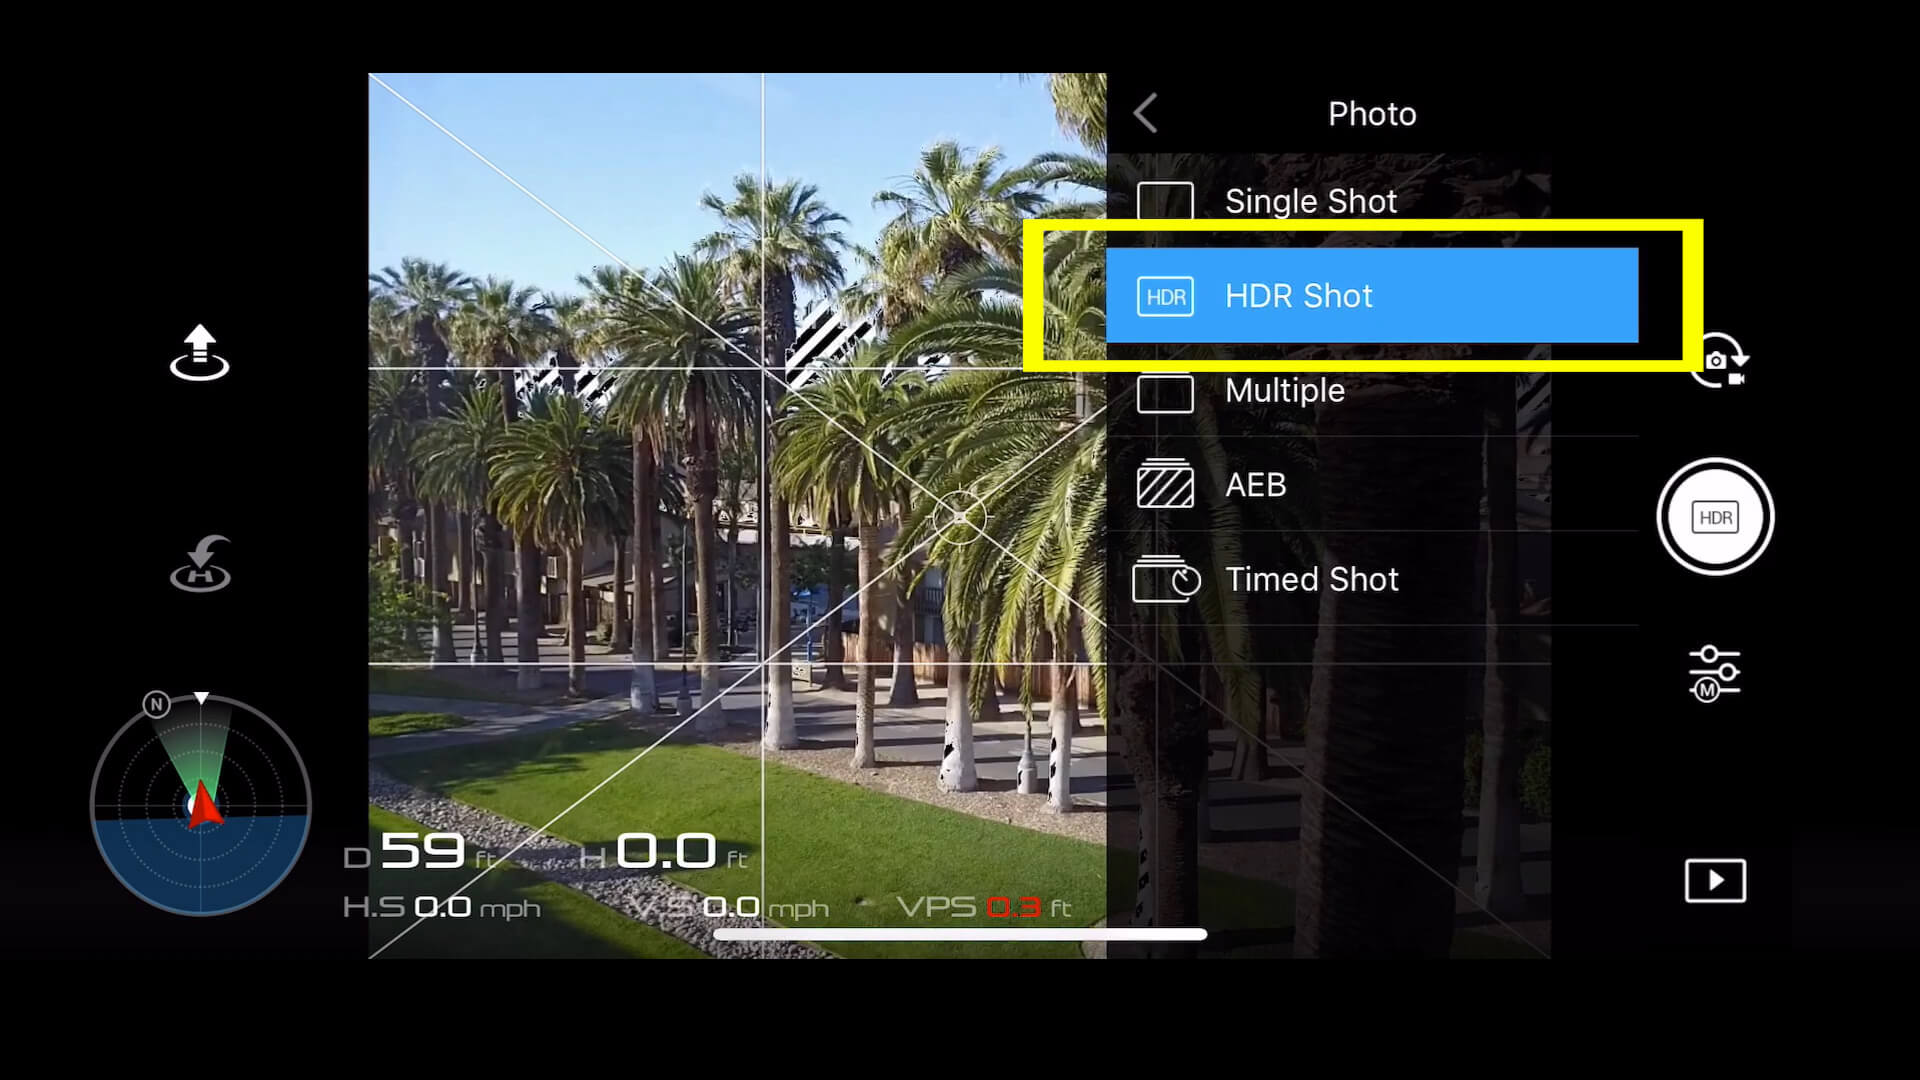
HDR MODE
I personally don’t really use the HDR mode, because it produces a JPEG which is a lossy format file that doesn’t let us get the absolute best quality which we will need in post-production.
MULTIPLE SHOT MODE
This mode is like burst mode on your DSLR camera. It can be great for helping you capture something in motion because it takes three or more photos back to back.
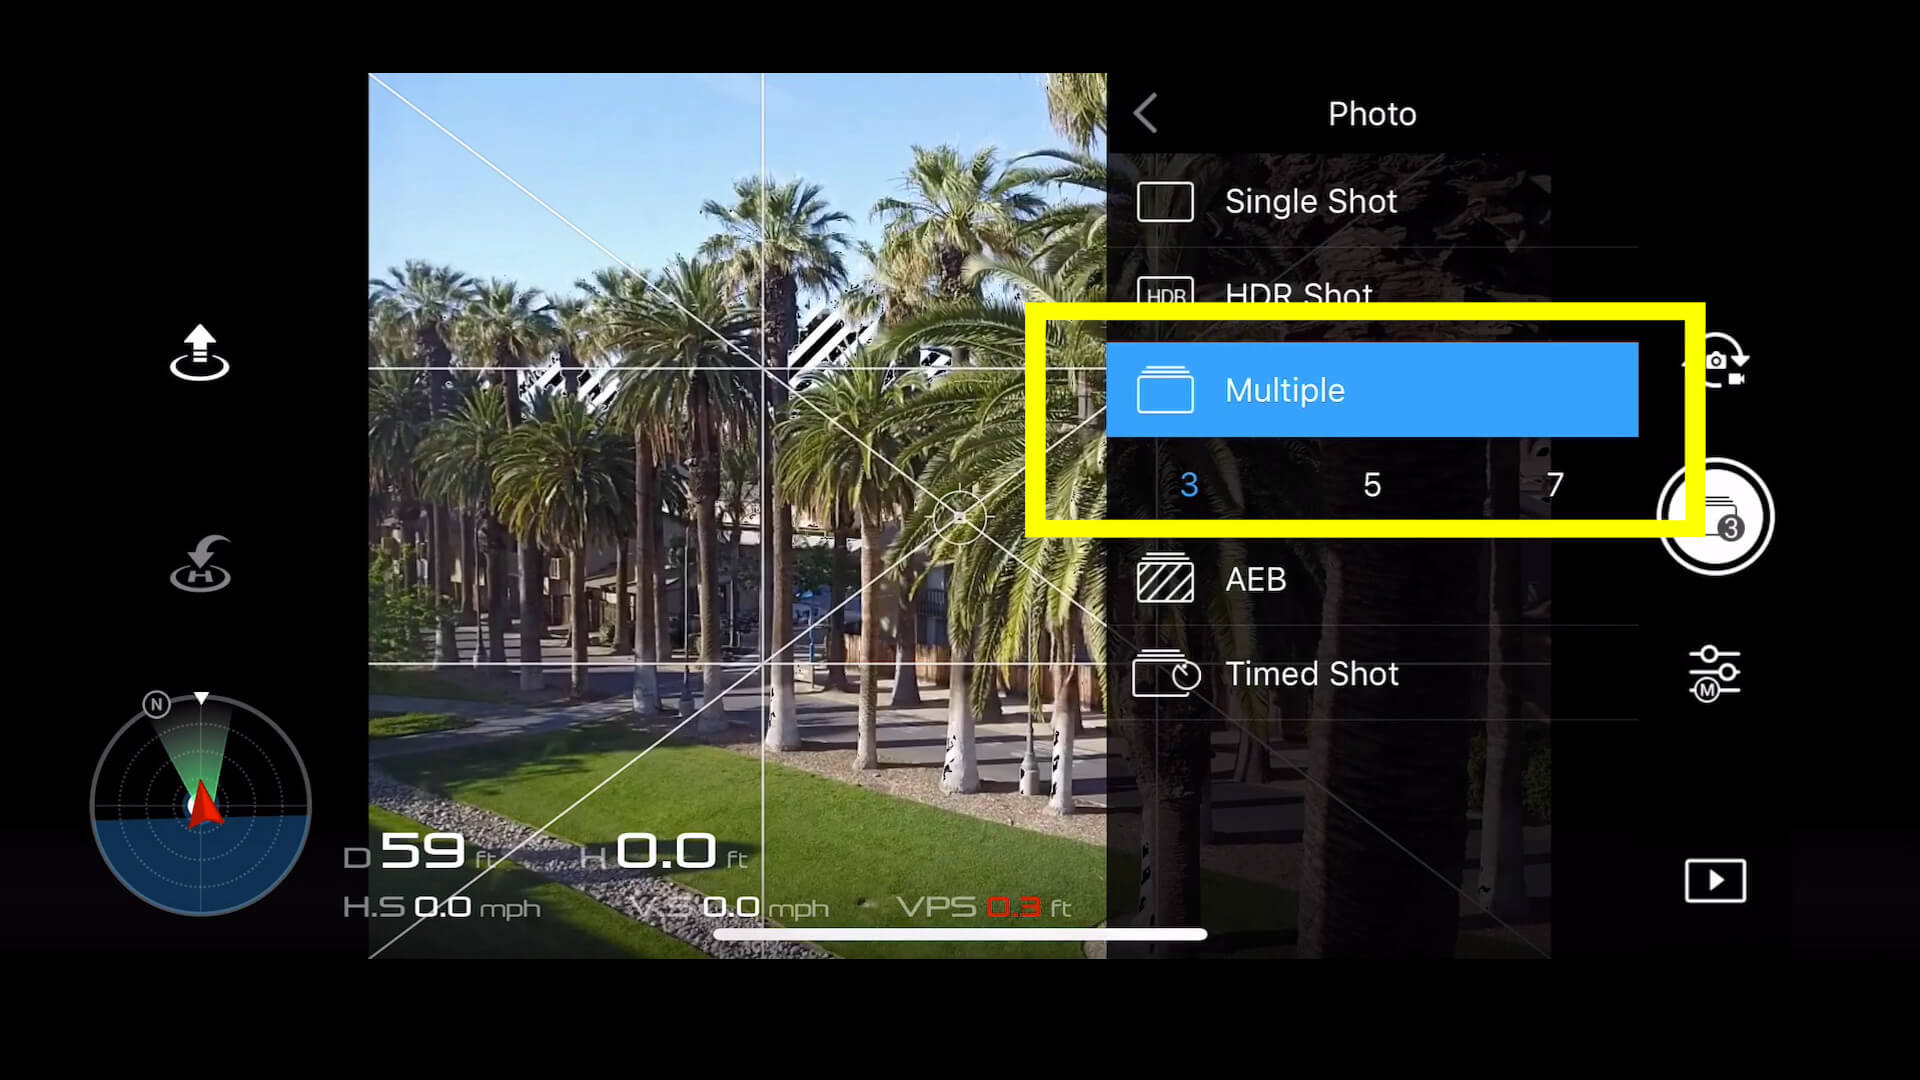
If you’re trying to perfectly time when a skateboarder performs their trick or when a car crosses a mark then this can help you out.
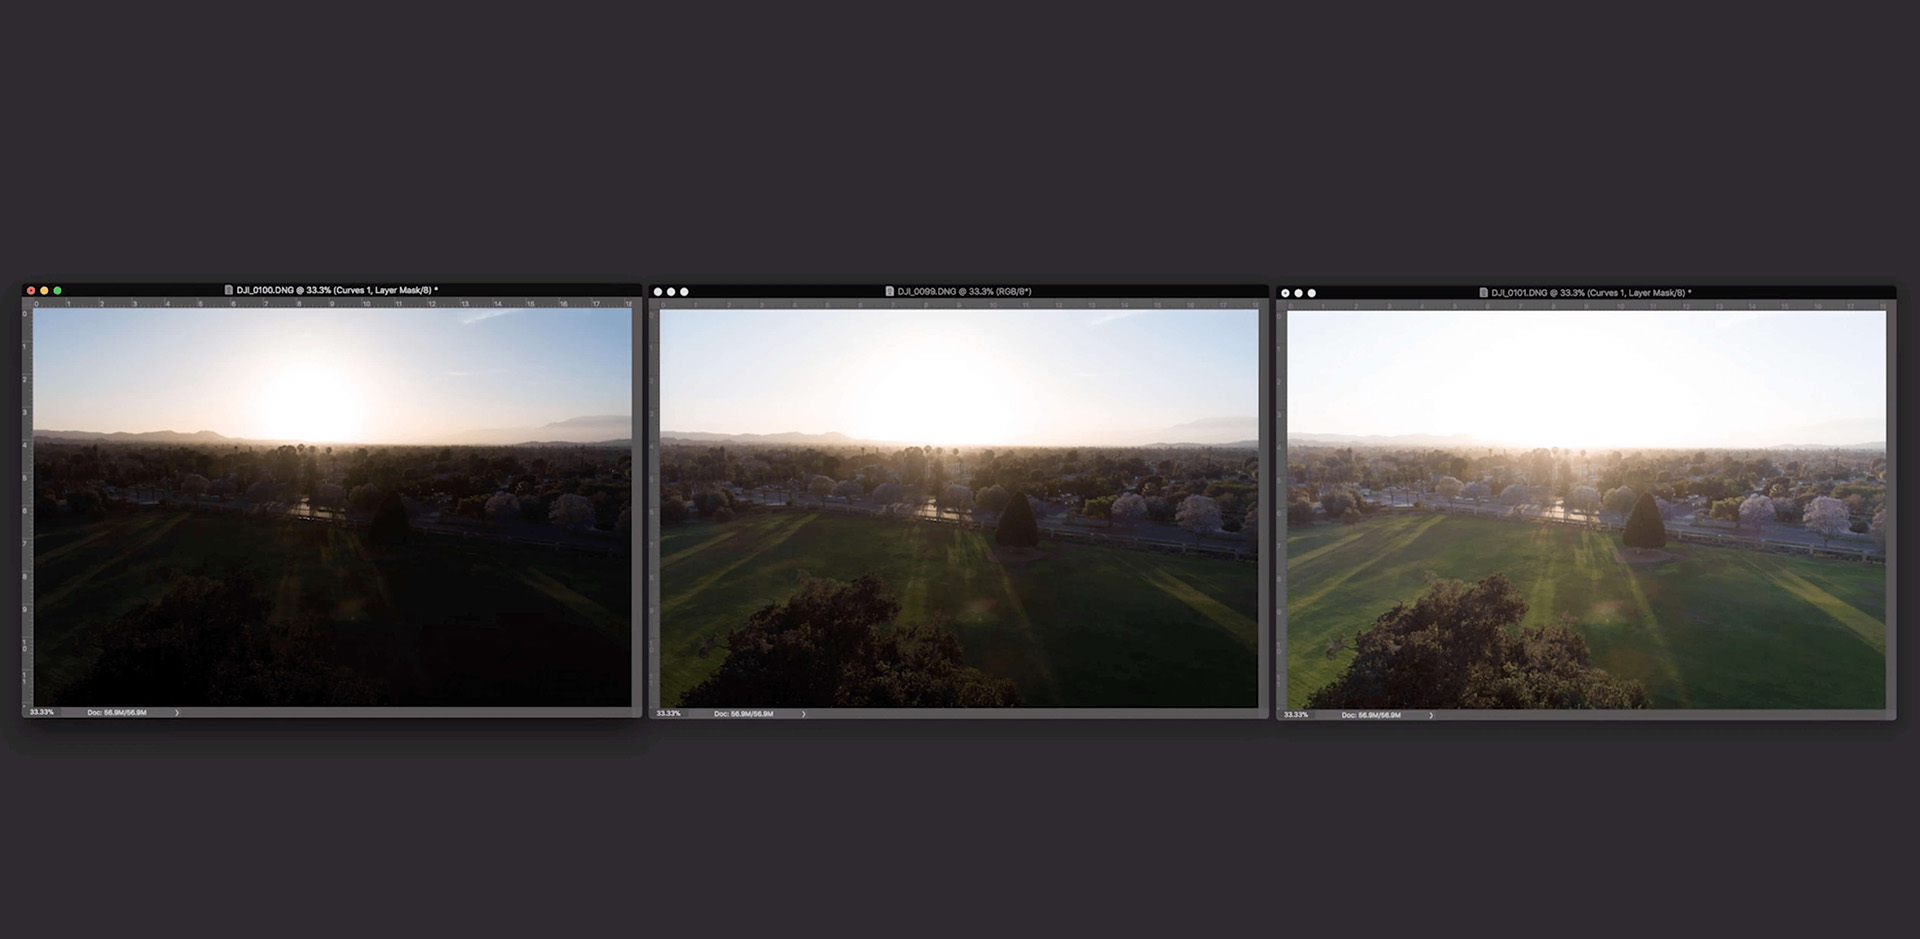
AUTOMATIC EXPOSURE BRACKETING
AEB or Automatic Exposure Bracketing is great for those times when you want to create an image with a lot of dynamic range.
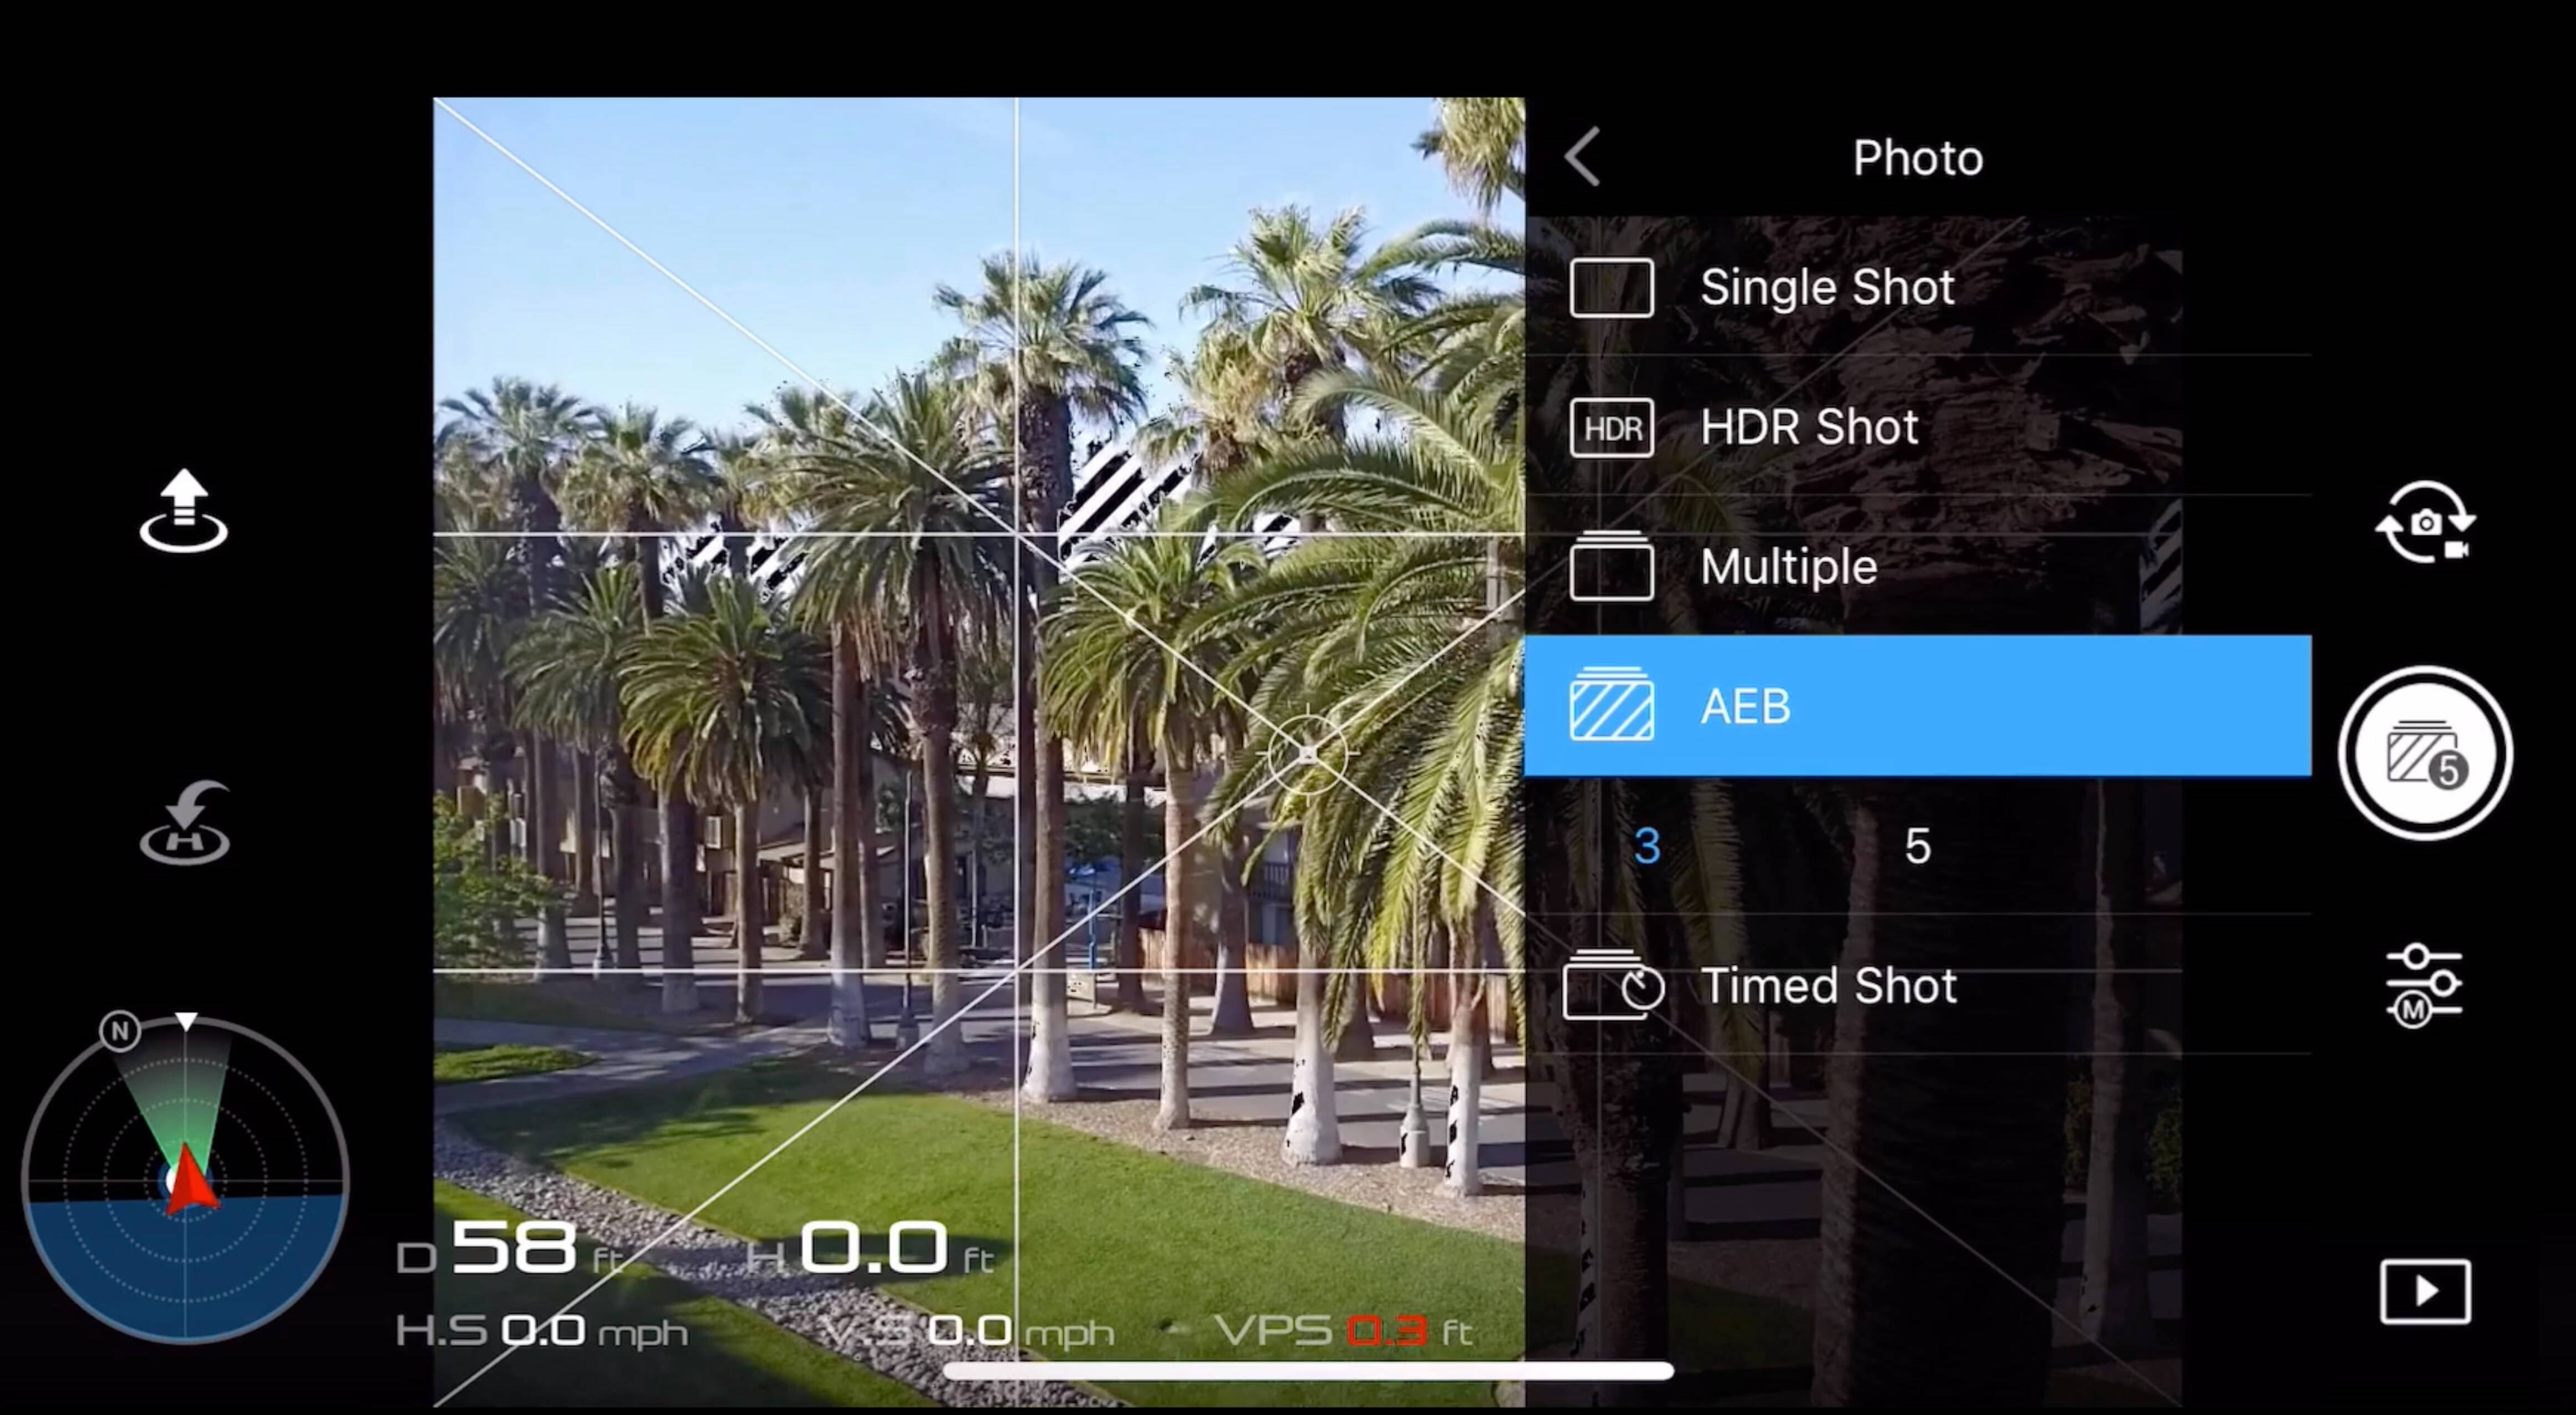

This setting helps you because the camera will snap multiple pictures below, above and at the exposure setting you set all in RAW image format.
Later you will need to merge them together in post.

TIMED SHOT
Finally, the timed shot can be helpful for creating a timed sequence of images, like when you want to create an aerial time-lapse.
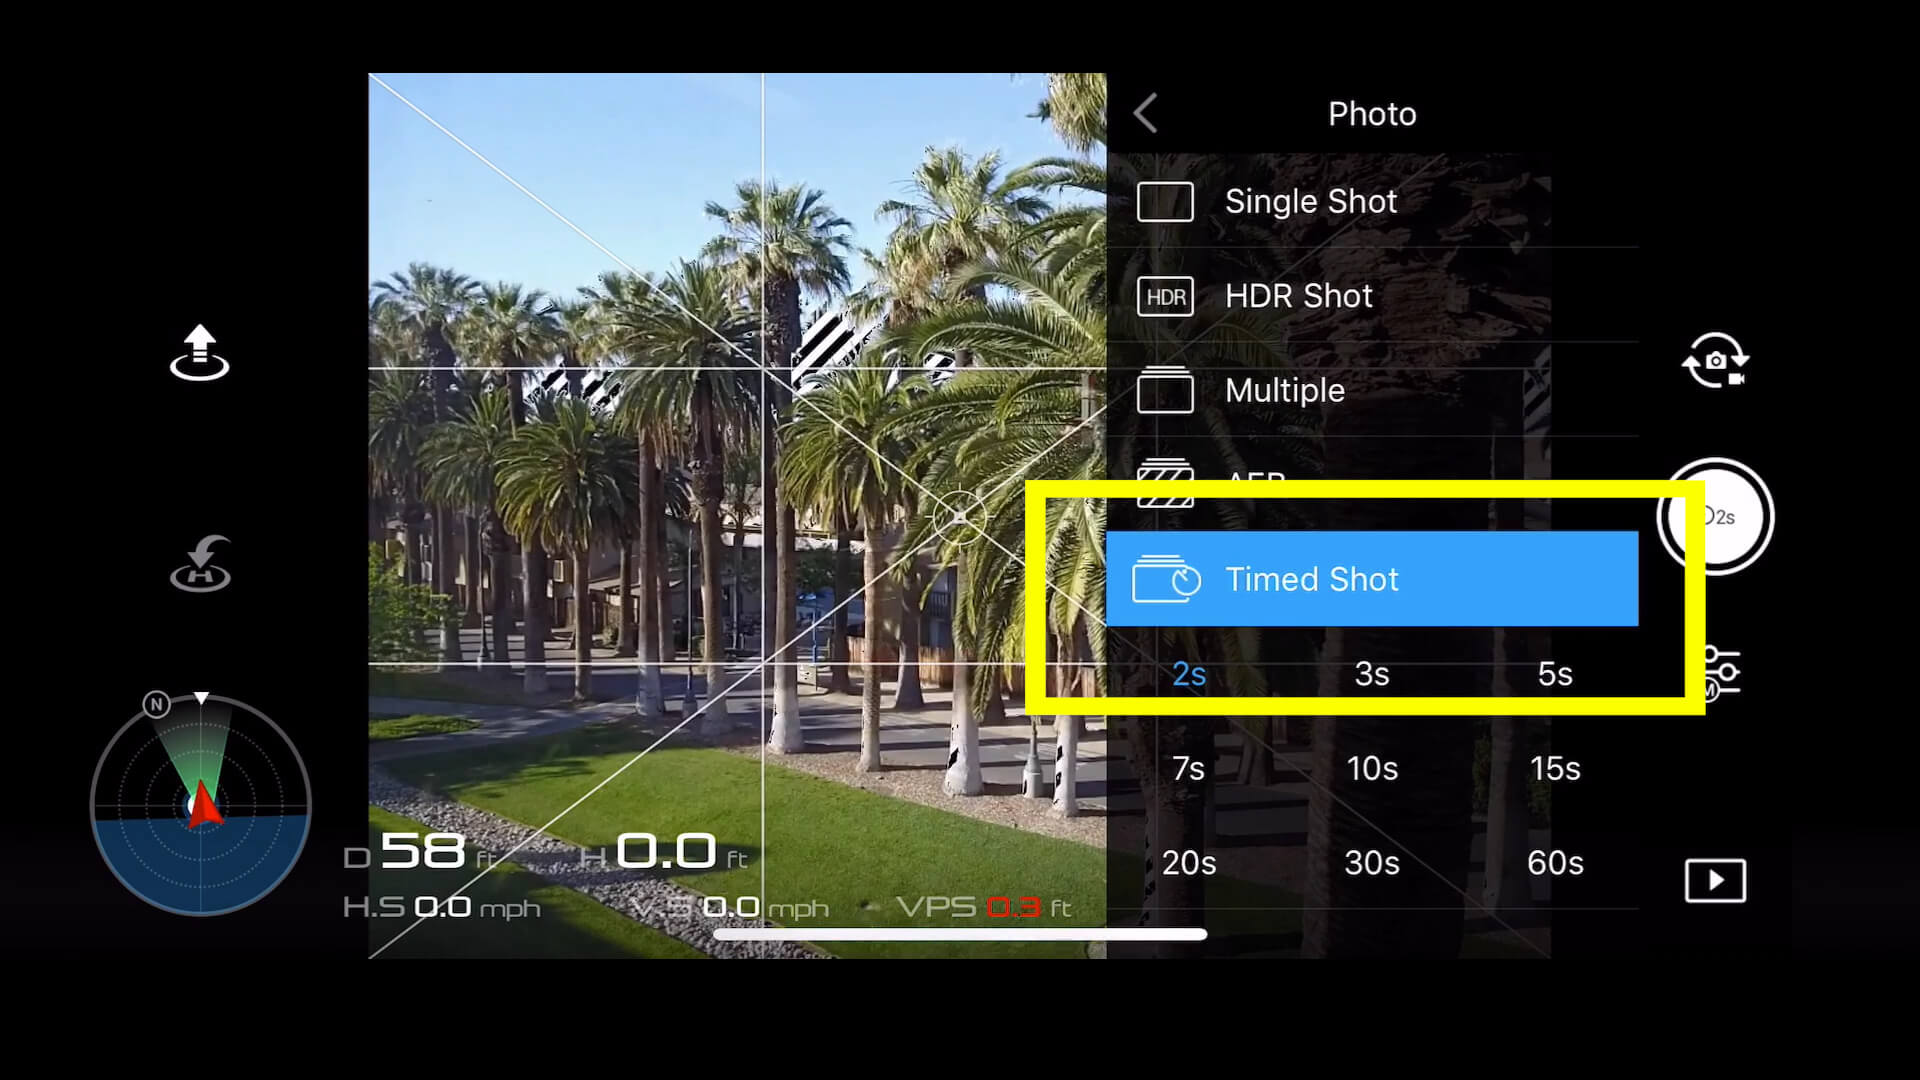
This is a nice feature because you don’t have to remember to keep pushing the shutter button each time.
IMAGE SIZE
To get the largest image size possible, go to image size, and on the Mavics set it to 4:3.
On the Phantoms set it to 3:2.

You might be tempted to use a different setting like 16×9 because you know many films use that aspect ration, but that will actually crop your photo, leaving you with a smaller image in the end.
So do any cropping in post instead of in camera.
SHOOT IN RAW
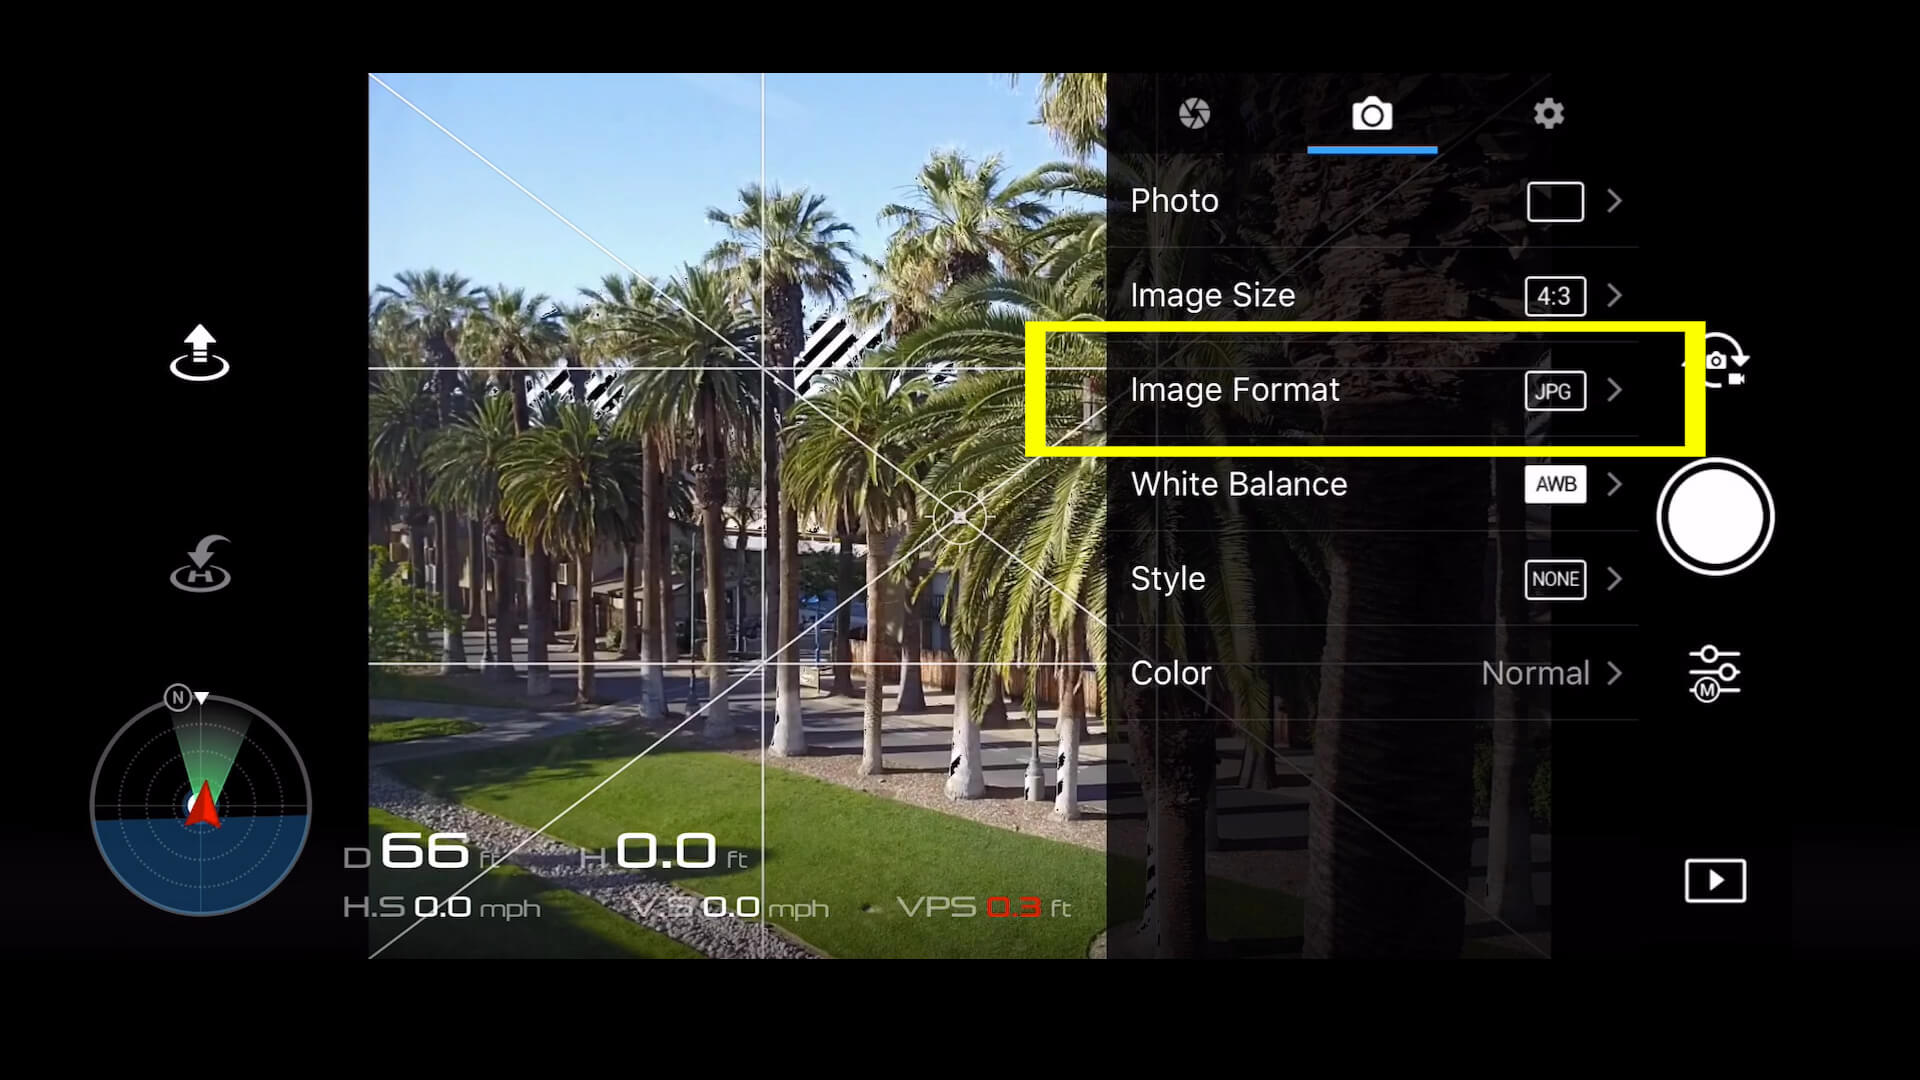
If you are not yet comfortable editing raw images, you can set it to JPEG + RAW.
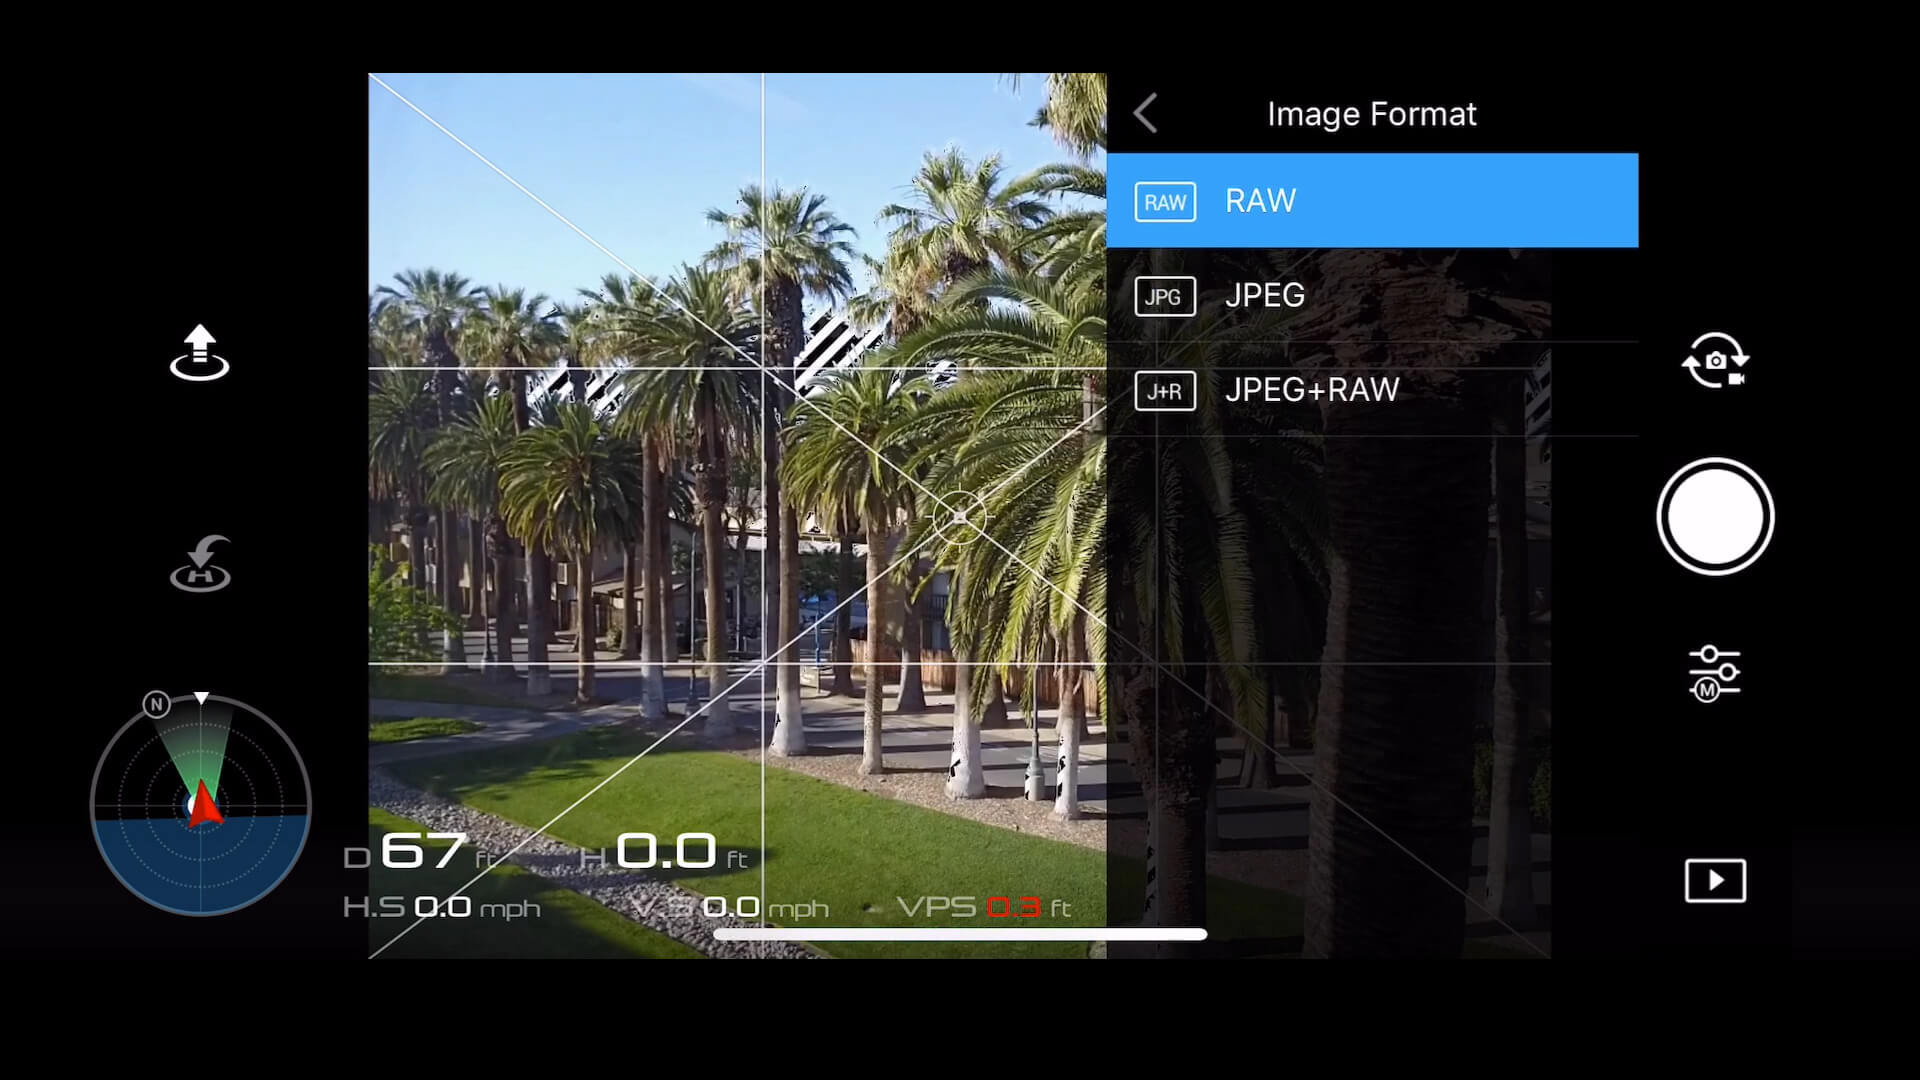
That will produce both a JPEG file and a RAW file, so you edit that at a later time when you are more comfortable with raw editing.
WHITE BALANCE
I don’t really use the auto white balance setting, so I manually set the white balance to the proper preset based on the conditions I am shooting in.
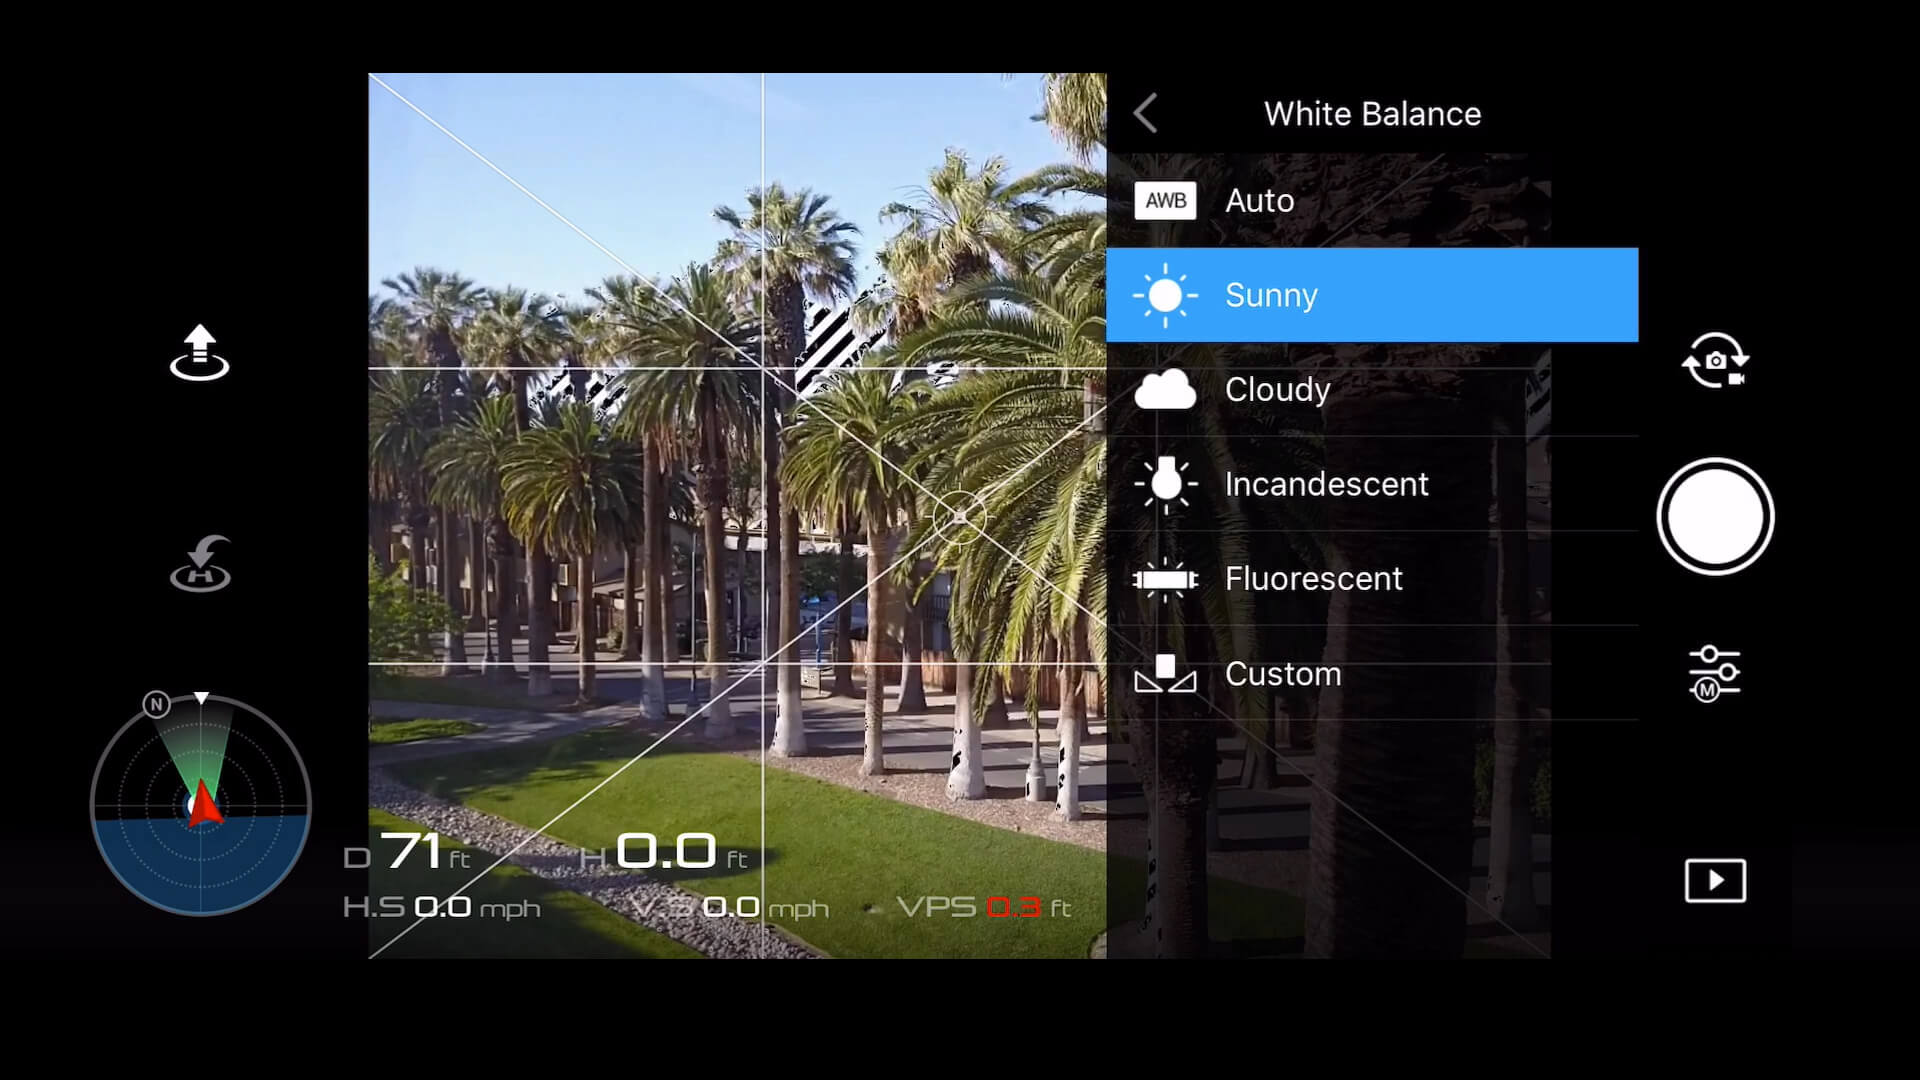
I do this because I want all my images to have the same color temperature.
This makes it easier when editing in post because you can quickly copy and paste edits to images with the same color temperature, which means the results won’t be unexpected.
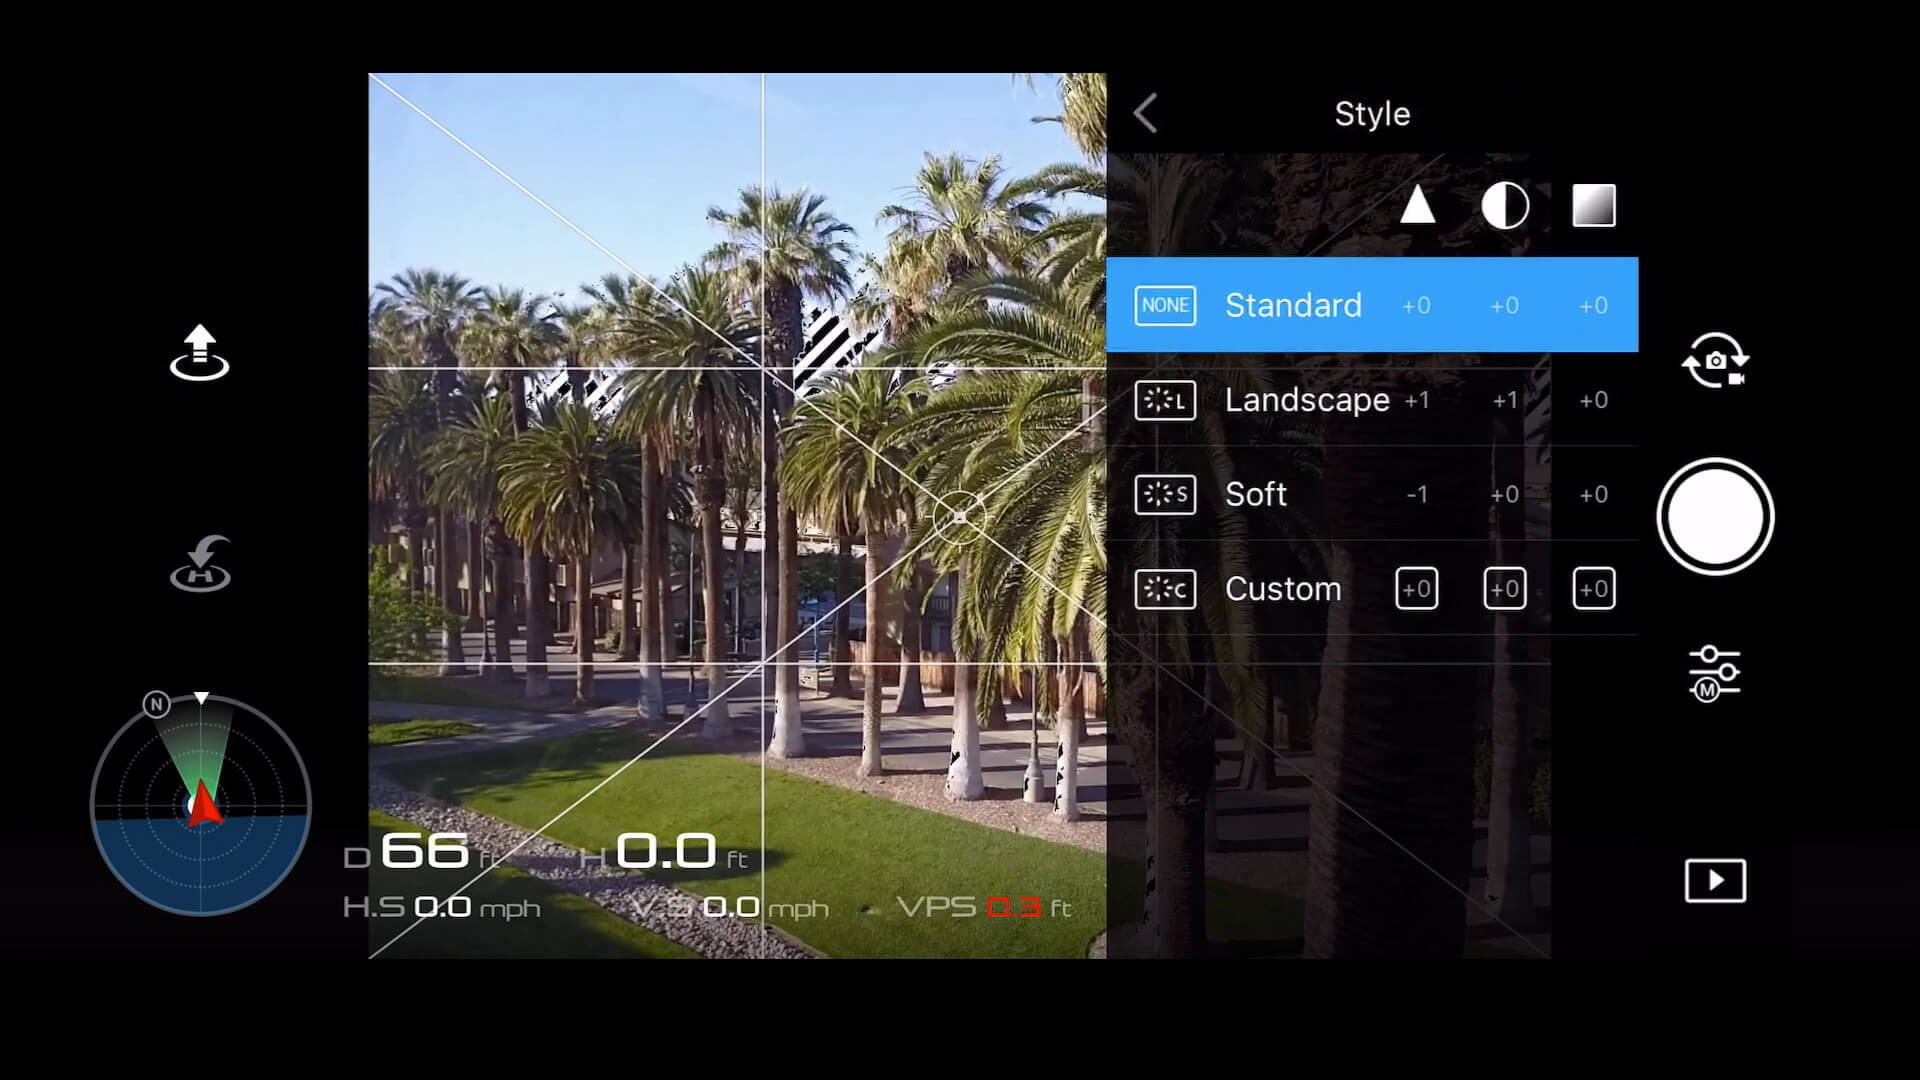
STYLE & COLOR PROFILES
If you are shooting in JPEG mode and don’t want to later edit your images in post then feel free to try out the various setting here in this menu.
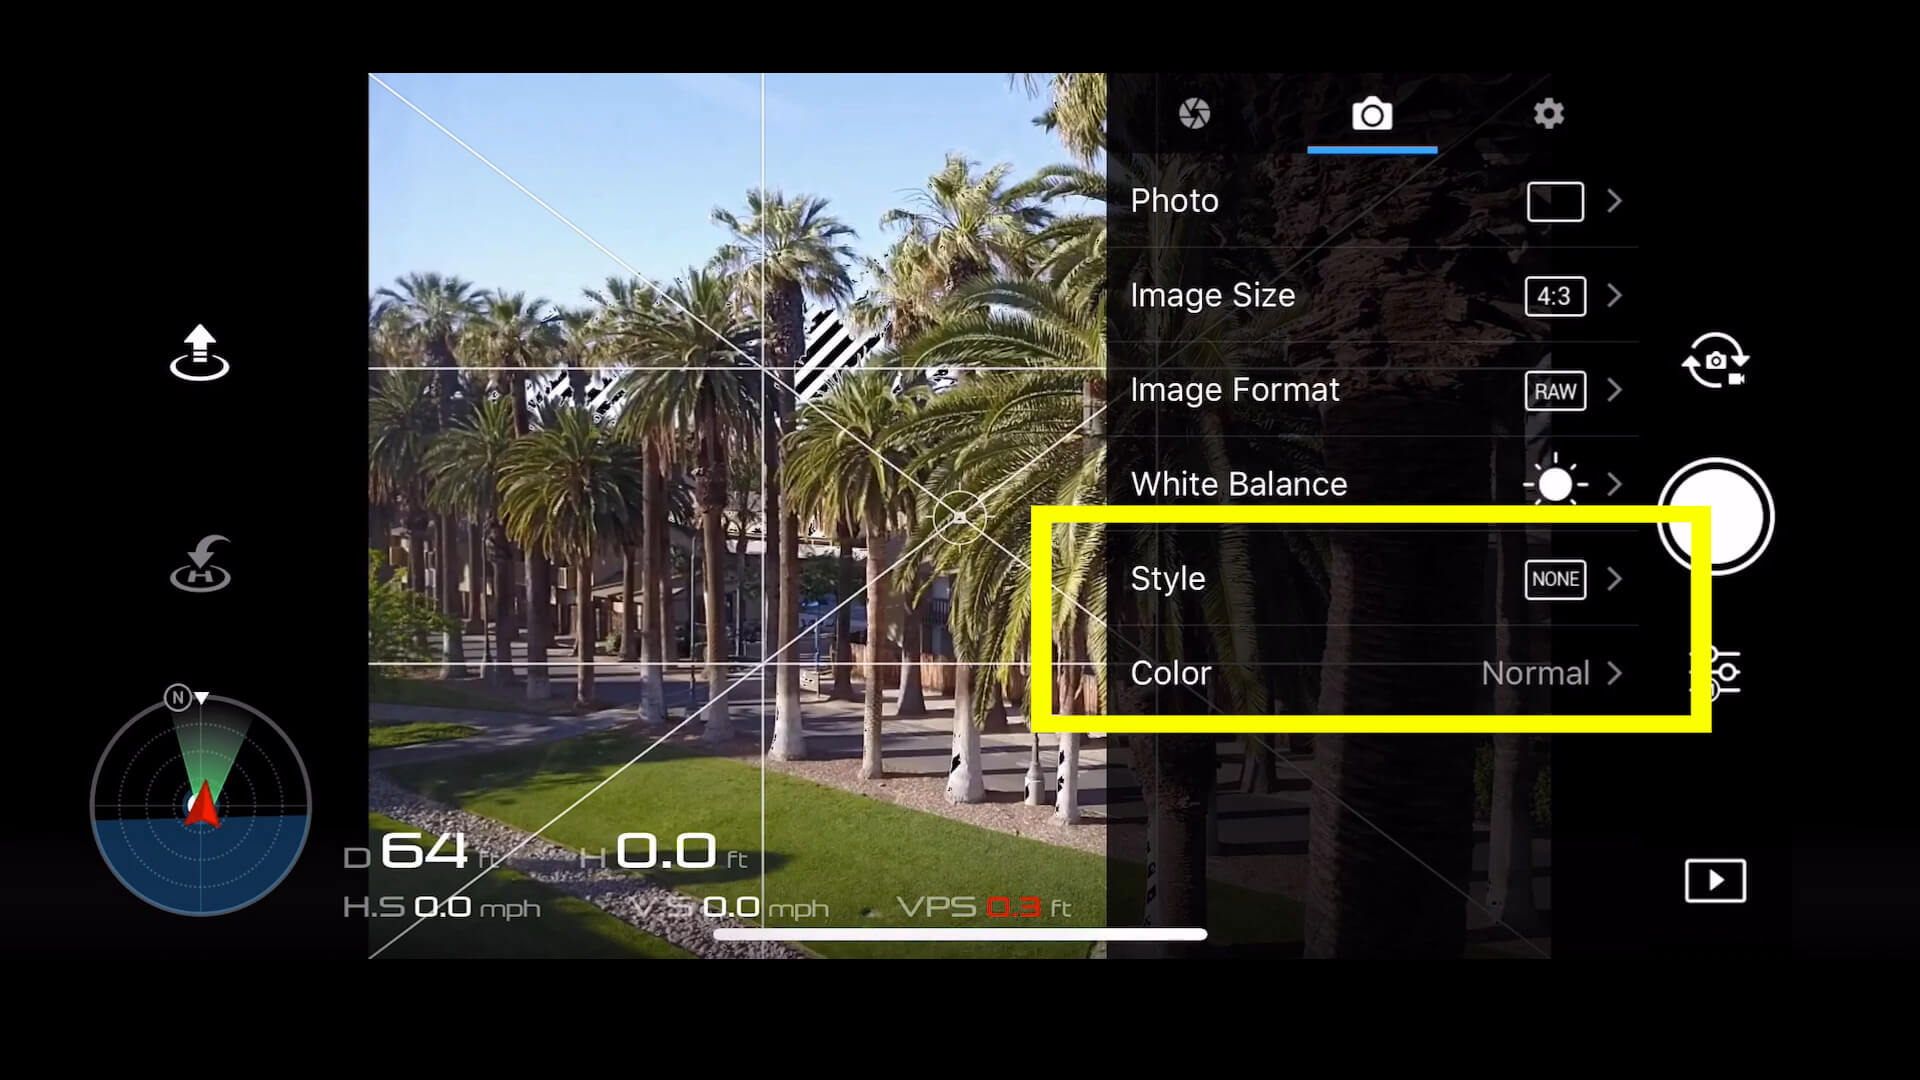
I personally don’t use the style or color options, because they don’t apply when you’re shooting images in RAW which as mentioned above is the only format I use.
CUSTOM BUTTONS
The last thing I want to encourage you to do is set up your custom buttons.
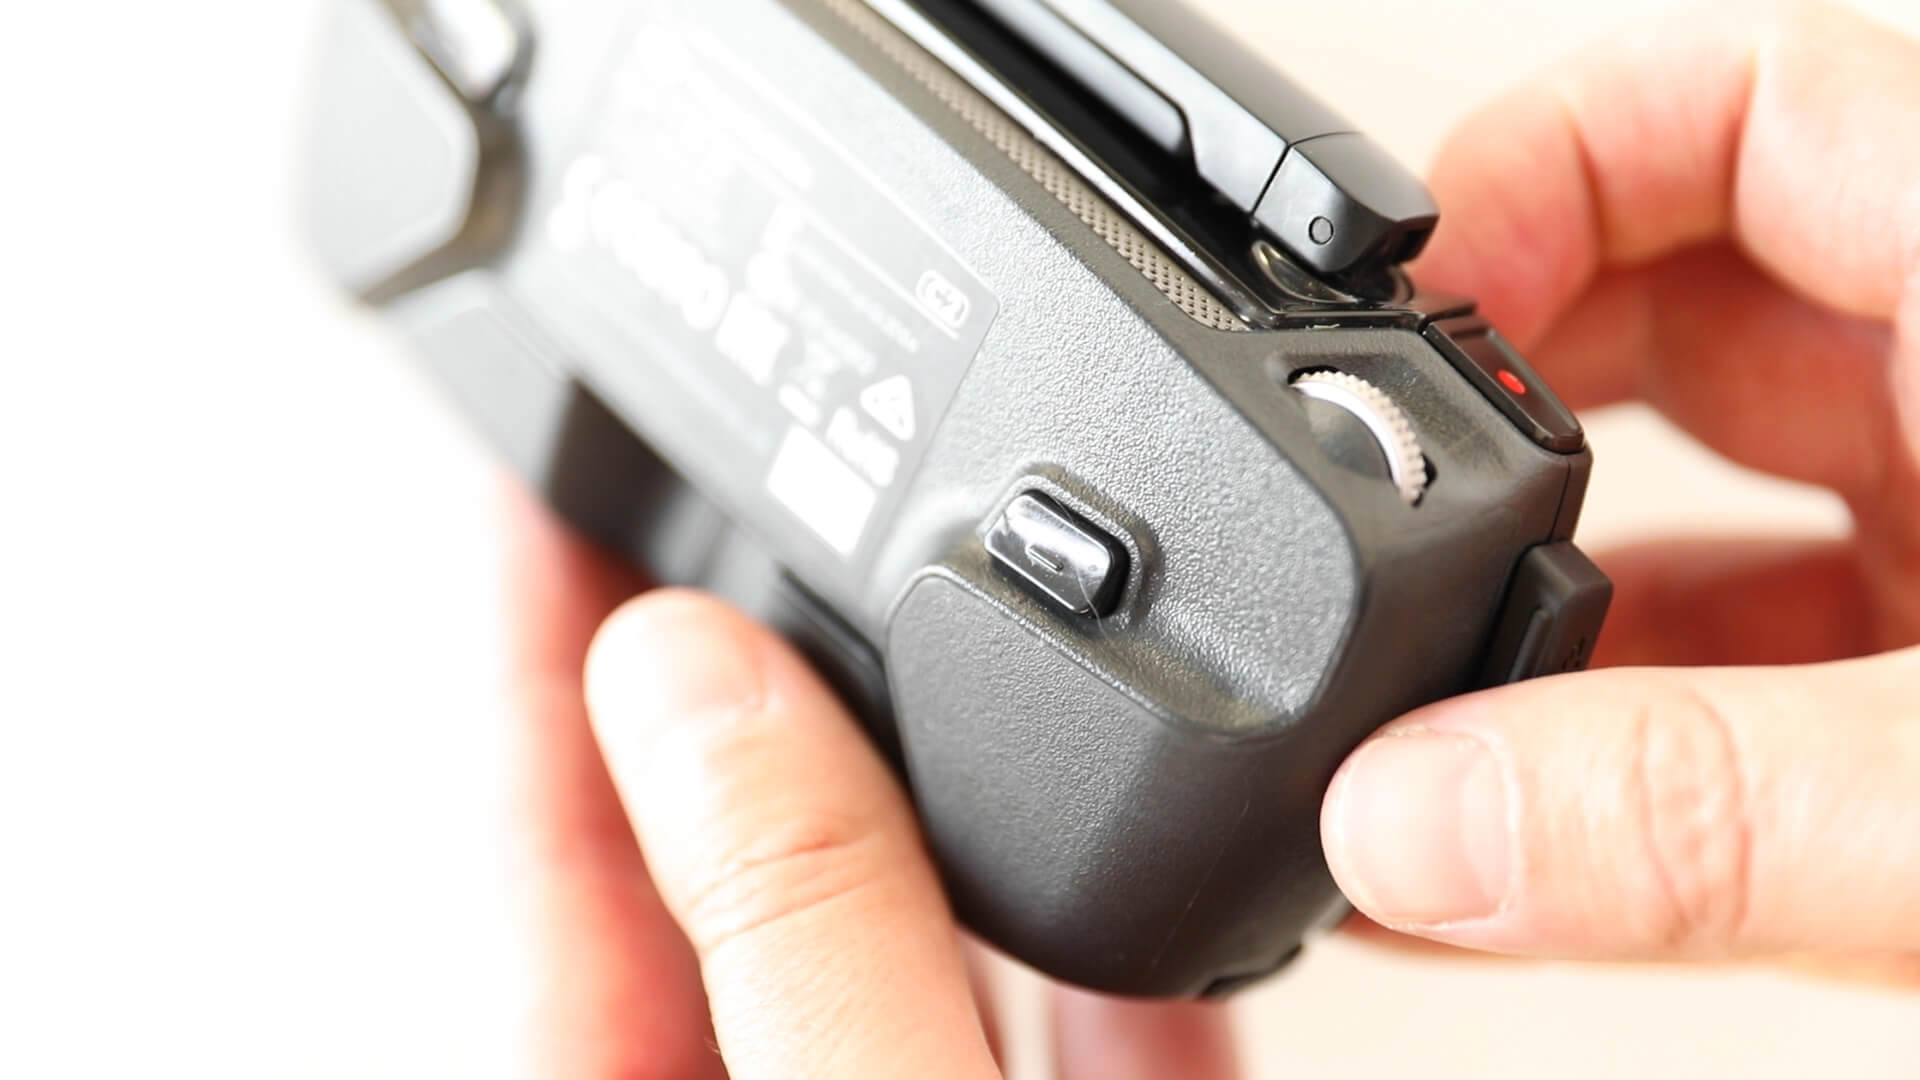
To do this, go to the main menu by clicking on the three little dots at the top right-hand side of your screen.
Then go to controller and scroll down. I like to set the custom button one to always center focus, so I can quickly confirm that the center of my screen will be in focus.
I like to have my other custom button two set to camera forward/down.
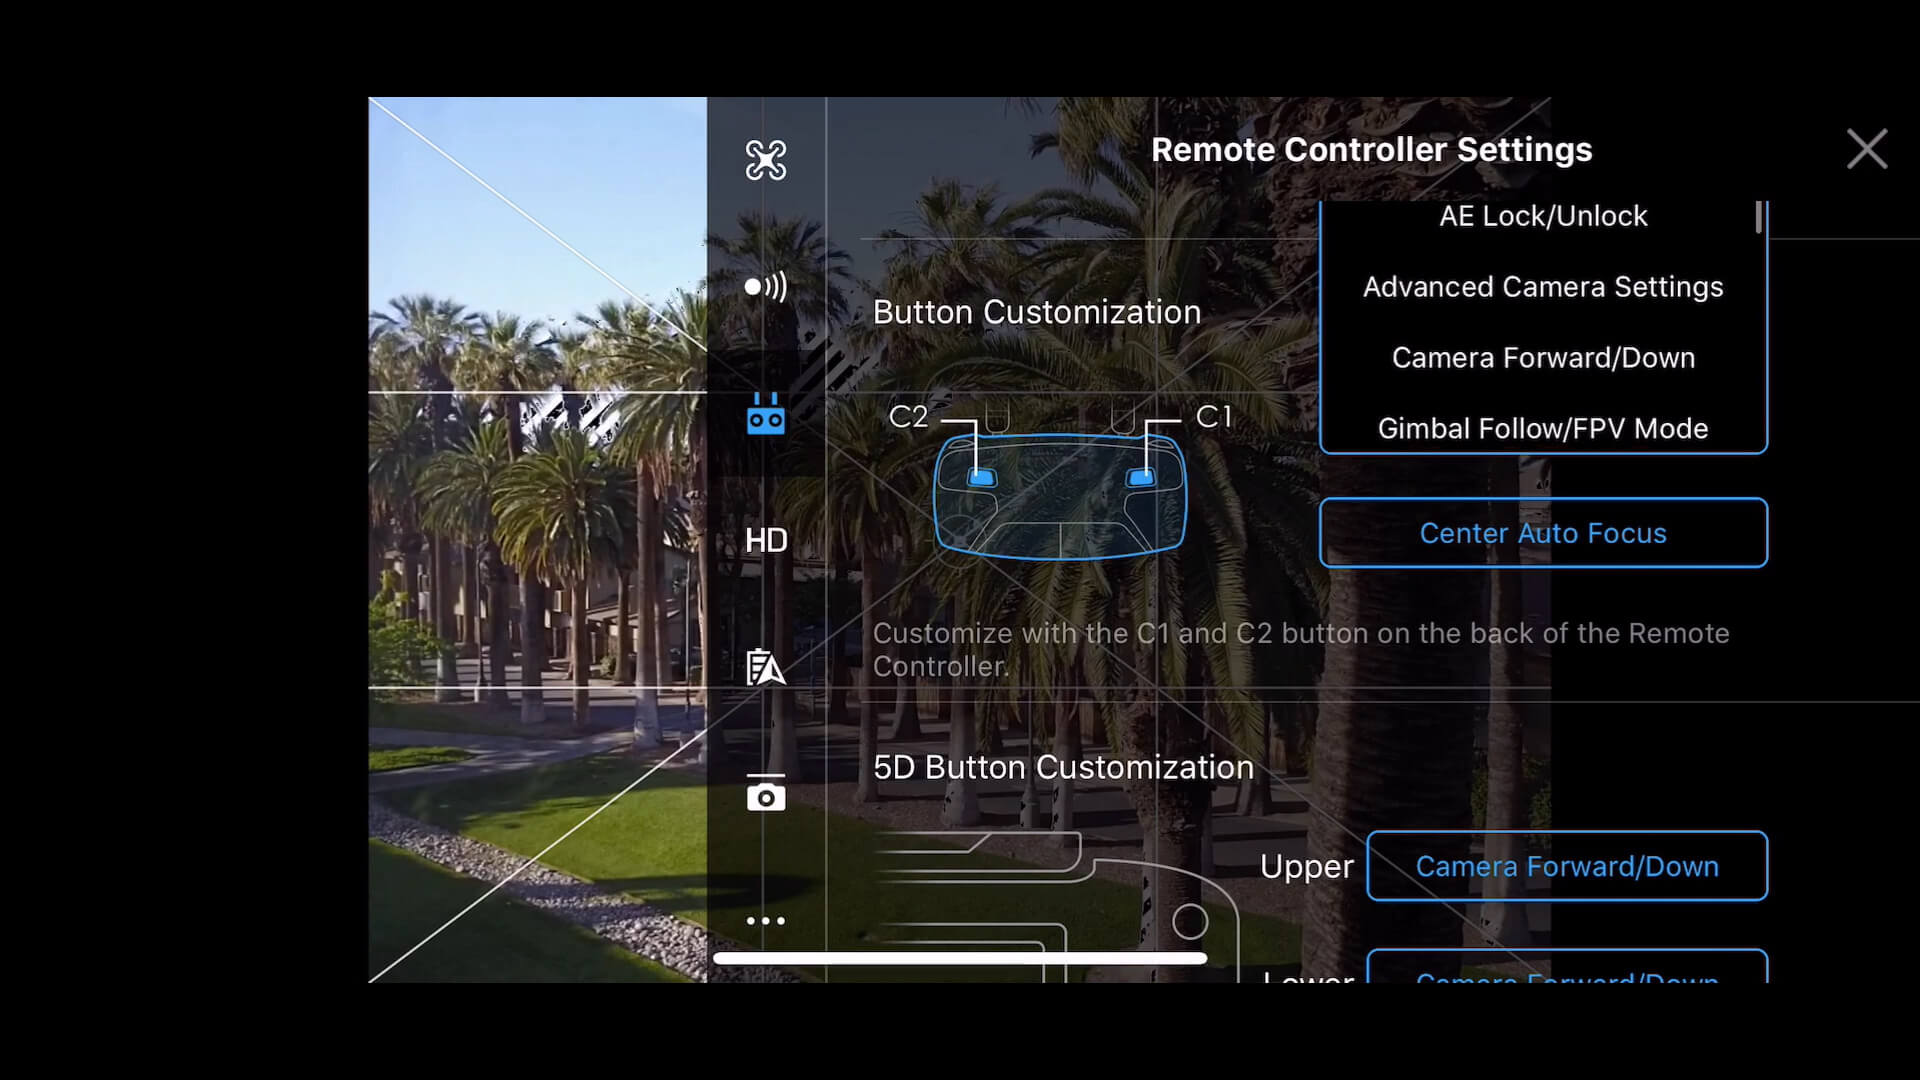
I do this so that I can quickly have my camera looking straight out or straight down, without having to wait for the gimbal to tilt into position.
In closing…
I want to encourage you to take the time to go through the menu items we discussed and really think about which setting you want to use and why.
You don’t want to be out in the field filming something and then get distracted by an improper white balance setting or miss an action moment because you didn’t have burst mode setup.
Once you master the various settings and their location in the DJI Go app you can spend your time focused on actually creating great imagery with your drone.
If you would like a much more in-depth look at all the other settings inside the DJI Go app then I encourage you to take a look at my most popular tutorial: The DJI Go App: A Step-by-Step Guide Through Every Setting.
More tutorials to help improve your photo and video game are here:
• 5 Drone Shots to Make Your Footage More Cinematic & Professional
• Tips for Better Drone Photography
Let’s connect!
Also if you’d like to help this website grow, I would be grateful if you considered using my DJI, Amazon, or Adorama links whenever you do any online shopping. I will make a small commission at no extra cost to you. Thanks so much in advance for your support in this way!
ABOUT AUTHOR


2018 Christmas Holiday Drone Gift Guide

Related
http://fromwhereidrone.com/best-drone-camera-settings-dji-go-app/