Why Do Drone Pilots Use ND Lens Filters?
If your drone footage is a bit of sluggish, which means you’re seeing a slight blur or smudge in your pictures, or the reverse, the place your video is just a bit too uneven and pixelated, it’s possible you’ll profit from utilizing an ND filter.
A couple of months in the past, I set my DJI Mavic Pro digicam to auto as an alternative of utilizing an ND filter. See how the footage appears a bit of off? That might’ve been smoothed out with an ND filter and correct mild management.
It’s all about the 180° shutter angle rule, or this concept that you just’re supposed to preserve a particular ratio between your shutter velocity and the frames per second (FPS) that you just’re capturing in. The motive for this rule is that if the shutter velocity is simply too gradual, you’ll get blurred motion. If it’s too excessive, you’ll get that sort of stop-motion look the place it’s a bit of uneven.
Traditionally, the commonest digicam setting for skilled filmmakers is a shutter velocity close to 1/48th of a second, and a body charge of 24 frames per second (FPS).
I’m not saying you want to lock your self into at all times capturing drone movies at 24 FPS. But as a rule of thumb, your shutter velocity ought to be double your body charge.
- If you’re capturing at 24 FPS, you’ll need to set a shutter velocity of 1/48th of a second
- If you’re capturing at 30 FPS, you’ll need to set a shutter velocity of 1/60th of a second
- If you’re capturing at 60 FPS, you’ll need to set a shutter velocity of 1/120th of a second
These ratios don’t want to be actual, however in accordance to the 180° shutter angle rule, they need to be shut. And whenever you shoot in auto like I did in the video above, it’s very tough to get these ratios proper! So set your digicam to guide and maintain studying 🙂
Of course, the 180° rule doesn’t at all times want to apply. I actually like what Ron Dawson has to say about breaking the rule over on this article:
Here are some ideas after I assume it is smart to break the 180 diploma shutter angle rule.
- Depth of Field: as I simply talked about, generally you’ll need to improve the shutter velocity to aid you attain a shallow depth of discipline. If it’s tremendous brilliant exterior, stopping up to f2.eight or or f1.four will completely blow out the visuals. Increasing the shutter velocity will cut back the mild and compensate for the brightness. There are occasions whenever you actually do want that shallow DoF and it is a great way to do it. Just don’t go loopy.
- Low Light: generally it’s possible you’ll be in a setting the place the mild is fairly low and so utilizing a slower shutter velocity will let extra mild in, serving to out. Depending in your digicam, this may give your picture extra of a “dreamy” look. When I shot with conventional camcorders, I’d usually shoot at 1/15 or slower as a result of I wished to get these dreamy streaks. I additionally used to shoot usually at 1/30 at 30 fps as an alternative of 1/60 as a result of it offers a softer, extra film-like look to conventional video. 1/60th may be very “video” wanting.
- Epic battle scenes: if you happen to’re capturing epic battle scenes, you might have considered trying to use quicker shutter speeds to get that staccato look. (I don’t know what number of occasions this may occasionally really come in useful, however a minimum of have it in your arsenal of data.)
Know Which ND Filter To Use
Neutral Density filters vary from ND to ND128, with the commonest ones being ND4, ND8, ND16 and ND32.
The ND filter that you just select relies on the quantity of sunshine round you and the sort of impact you need to obtain, so be certain to experiment flying and recording footage in a whole lot of completely different environments to get the greatest really feel for what sort of look you’re wanting to obtain.
The greater the ND quantity, the extra mild the filter prevents from coming by way of the lens.
Here are some notes re: various kinds of ND filters:
- An ND4 filter reduces mild by 1/four. This permits you to gradual the shutter velocity from 1/100 of a second to 1/25 of a second.
- An ND8 filter reduces mild by 1/eight. This permits you to gradual the shutter velocity from 1/200 of a second to 1/25 of a second.
- An ND16 filter reduces mild by 1/16. This permits you to gradual the shutter velocity from 1/400 of a second to 1/25 of a second.
On sunny and brighter days, attempt utilizing an ND8 or ND16 filter.
On darker and cloudier days, attempt utilizing an ND4 filter.
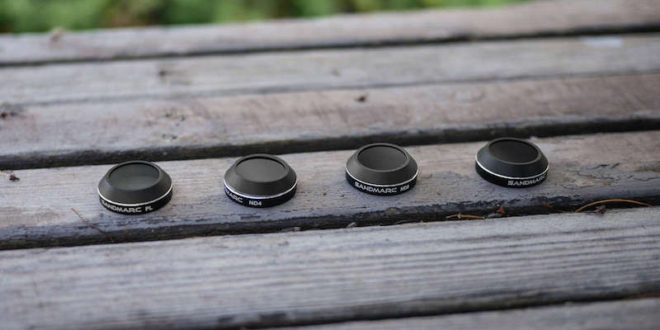
Shot with the SANDMARC Aerial Filters for DJI Mavic Pro
Reviewing the SANDMARC Aerial Filters for the DJI Mavic Pro
As lots of , I’ve been having fun with my DJI Mavic Pro for its portability and flight intelligence. I’ve been attempting to do some extra aerial cinematography right here and there. Here are some current movies with footage from South Carolina and Namibia.
I linked with the SANDMARC crew, who taught me a bit about their aerial filters and the way they’d assist me to produce greater high quality footage and finally to have extra flexibility in the forms of pictures I’m wanting to get.
Here have been a couple of takeaways as I started testing out their filters:
- The DJI Go four app interface makes it straightforward to change from computerized to guide mode, permitting you to simply modify the ISO, body charge, and shutter velocity, all of that are associated to which ND filter you must use to obtain your required impact.
- Always energy down the plane earlier than including or eradicating an aerial ND filter to keep away from damaging the gimbal.
- Even although the filters are mild and received’t seemingly have an effect on your gimbal’s heart of gravity and calibration, I at all times like to re-calibrate the gimbal when including or eradicating an ND aerial filter. It can’t harm, proper?
- Play round with the Polarizer filter! It’s nice for minimizing glare and growing colour saturation on brilliant, sunny days when shutter velocity isn’t a difficulty.
If you’re wanting to stage up your aerial cinematography efforts, then contemplate shopping for a set of aerial filters to provide you with extra flexibility to management your digicam.

I loved flying with the SANDMARC aerial filters and getting to know their crew.


Alan Perlman
Founder & CEO
Alan is an FAA-certified drone pilot and based UAV Coach in 2014 to assist join drone fans, to present world-class sUAS business coaching programs, and to assist push the drone neighborhood ahead with a give attention to security and business alternatives.